Lesson 01 — Mixing Colors
Learners mix two colors to make a new one and use it in a picture. They discover that many of the world's colors come from mixing, and that mixing is a kind of making everyone can do.
Objectives
Objectives
- D07.S1.02.01 Mix two colors to make a new one and use it in a picture.
Essential question
How do I mix two colors to make a new one and use it in a picture?
Key vocabulary
Materials
Standard materials
- Paints in red, yellow, and blue (or food color) · 1 set per learner or pair Three starting colors to mix from; water-based paint or washable ink
- A mixing surface · 1 per learner or pair A plate, paper, or tile to mix on
- Paper and brushes or fingers · per learner To paint the picture using the new color
Low-tech / no-cost
- Colored earth, crushed flowers, or berries Red, yellow, and blue-ish natural pigments mixed with water to make new colors
- A flat stone or leaf as a palette Mix the natural colors right on a stone or leaf
Enriched / lab & device
- A color wheel to keep · 1 per learner A paper wheel showing which two colors make each new one
- A few fabric or yarn samples in mixed colors · 1 set Cloth dyed with mixed colors from more than one culture, to notice how mixing lives in real cloth
Works in different contexts
- large-group Demonstrate one mix big at the front — "red and yellow make orange" — then let pairs mix while you circle and name the new colors they discover
- multi-age Older learners mix and name the new color while younger learners paint with it; pair a mixer with a painter
- self-directed A learner mixes two colors, names the new one, and uses it in a picture, then tells a grown-up or recording which two they mixed
- level-grouped Some learners mix one new color and use it; others mix several and name them all; match the challenge
- outdoor-only Mix crushed flower, berry, or earth colors in water on a stone, and paint the new color with a finger or twig brush
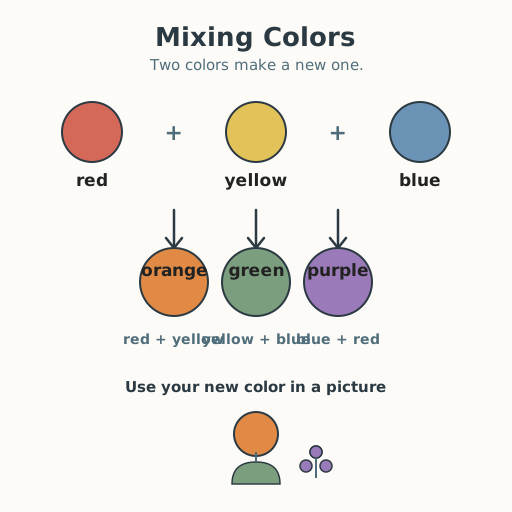
Lesson 1 — Mixing Colors
Summary
Learners mix two colors to make a new color and use it in a picture. They discover that colors all around them — orange fruit, green leaves, purple cloth — are often made by mixing two other colors, and that people everywhere have mixed colors to dye cloth, paint walls, and make pictures.
Objectives
- Mix two colors to make a new one and use it in a picture. (D07.S1.02.01)
Connection
Look at the colors around you — a green leaf, an orange fruit, a purple cloth, a brown clay pot. Many of these colors are not found ready-made; they are mixed from two others. For a long time, people everywhere have mixed colors to dye cloth, paint homes, and make pictures — from indigo cloth dyed in one part of the world to ochre earth painted on walls in another. Today you will mix two colors and use your new color in a picture.
Materials
- Paints in red, yellow, and blue (or food color)
- A mixing surface (a plate, paper, or tile)
- Paper and brushes or fingers
Preparation
- Set out the three starting colors and a mixing surface for each learner or pair.
- Have paper ready, and a way to wash hands after painting.
Facilitator note
This lesson is written to the learner (“you”) so it works in a classroom and for a self-directed learner. Mixing is a skill, so model it once — “watch: red and yellow make orange” — before learners try on their own (Kirschner, Sweller & Clark, 2006). There is no wrong new color; a muddy brown is a real discovery, not a mistake. Name the colors learners make without judging them (“you made a warm orange!”). A learner who is blind or has low vision mixes by feel and temperature and smell: they feel the two blobs merge, and a partner or grown-up names the new color; they can still choose the picture’s subject and feel the wet paint with a finger. A learner who does not speak names the new color by pointing to a color swatch or a matching object. A learner with limited fine motor mixes with a bigger brush, a sponge, or by directing a partner who does the brushwork — deciding the mix is mixing.
Procedure
- Gather (5 min). Look at the three colors in front of you: red, yellow, and blue. These are starting colors. Today you will mix two of them to make a brand-new color.
- Mix two colors (15 min). Put a little red and a little yellow on your mixing surface and stir. What color appears? Try another pair — yellow and blue, or blue and red. Watch a new color be born from two others. Say or point to the new color you made.
- Use your new color (15 min). Paint a picture that uses the new color you made. An orange sun, green leaves, a purple flower, a brown path — or an invented thing. Your new color is yours; no one has made exactly this mix before.
- Share (10 min). Show a friend or grown-up your picture. Tell (or point to) which two colors you mixed and what new color appeared.
- Close (5 min). Remember: many colors in the world are made by mixing. Every new color you mix belongs to you and to everyone who ever mixed color before you.
Differentiation
- Support: Offer one clear mix (“red and yellow — stir them and watch”); let the learner name the one new color and paint with it.
- Support (blind/low-vision): Mix by feel; a partner names the new color and the learner chooses the picture’s subject, feeling the paint with a finger.
- Support (non-speaking): Name the new color by pointing to a swatch or a matching object.
- Support (fine motor): Mix with a bigger brush or sponge, or direct a partner who stirs and paints.
- Extension: Invite learners to mix a light and a dark version of one new color (more or less of one starting color) and name the difference.
Assessment
- Formative (observation): Does the learner mix two colors to make a new one and use it in a picture?
- Artifact (portfolio): The learner’s picture using the mixed color, kept in the portfolio (or a photo of it).
Home connection
At home, find two colors that could mix — two crayons, two drops of food color, two bits of clay — and mix them with a grown-up. What new color appears? Then use it in a small picture.