Lesson 01 — Designing a Tool to Meet a Need
Learners explain that to design a tool is to make something to meet a need, and they describe one step in designing. They meet the design steps — find a need, imagine ideas, choose and make, test, and improve — through a worked example (a scoop for grain), then name a need of their own, draw an idea, and label one design step.
Objectives
Objectives
- D10.S1.04.01 Explain what it means to design a tool (making something to meet a need) and describe one step in designing.
Essential question
What does it mean to design a tool, and what is one step in designing?
Key vocabulary
Materials
Standard materials
- Design steps chart · 1 Need → Imagine → Make → Test → Improve, with a simple worked example (a scoop for grain)
- Paper and pencils · per learner For naming a need, drawing an idea, and labeling one design step
Low-tech / no-cost
- Spoken examples and found objects Name needs aloud and sketch in the dirt or with a stick; no printed chart needed
- Voice and body Act out each design step — finding a need, imagining, making, testing, improving
Enriched / lab & device
- Simple building bits · per pair Cardboard, tape, string, or clay to make a rough model of the imagined tool
- A device to view one short design-story video · 1 Optional — watch how one real tool was designed and improved over time
Works in different contexts
- large-group Show the design steps chart large; the whole group names the need and one step together before a few learners place each step in order
- self-directed A learner names a need of their own, draws an idea, and writes or says one design step and why it matters
- outdoor-only Find a need outside (carrying water, reaching fruit, shading from sun) and sketch the tool in the dirt, naming one design step
- multi-age Older learners read the design steps aloud and coach younger ones in naming a need; everyone draws one idea
- level-grouped Learners who finish early add a second need and describe two steps; others name one need and one step
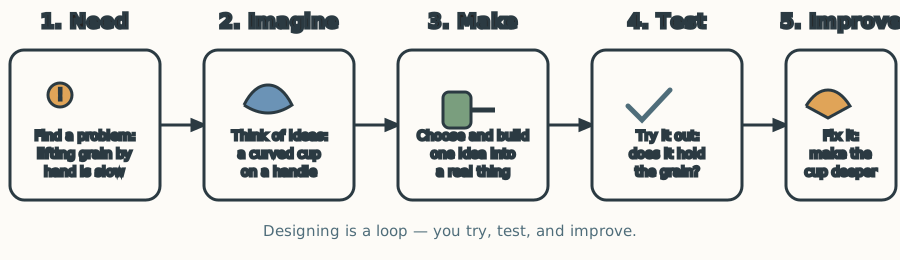
Lesson 1 — Designing a Tool to Meet a Need
Summary
Learners explain that to design a tool is to make something to meet a need, and they describe one step in designing. They meet the design steps — find the need, imagine ideas, choose and make, test, and improve — through a worked example (a scoop for grain), then name a need of their own, draw an idea, and label one design step.
Objectives
- Explain what it means to design a tool (making something to meet a need) and describe one step in designing. (D10.S1.04.01)
Connection
Think of something that was hard to do lately: carrying water a long way, reaching a high shelf, or sweeping a dusty floor with no broom. A tool is anything people make to make a job easier, and design is the thinking-and-making work of creating it: you notice a need, you imagine something that could meet it, you make it, you test it, and you improve it. People have always done this — a woven basket, a clay pot, a bicycle, a water pump all began as someone’s answer to a need.
Materials
- Design steps chart (Need → Imagine → Make → Test → Improve) with a worked example
- Paper and pencils
Preparation
- Prepare the design steps chart, with the worked example “a scoop for grain”: the need (lifting grain one handful at a time is slow), an idea (a curved cup on a handle), making it, testing it (does it hold grain?), and improving it (make the cup deeper).
- Set out paper and pencils.
- Prepare a few simple needs from daily life to offer as starting points (carrying water, shading from sun, holding things together, keeping food cool).
Facilitator note
This lesson is written to the learner (“you”). This is the Grade 4 upgrade of Grade 3’s “name a simple machine”: now learners name what design is (making something to meet a need) and can describe one step in the process. Teach the steps with explicit instruction and a worked example before learners work independently (Kirschner, Sweller & Clark, 2006): model “find the need → imagine → make → test → improve” on the grain scoop once, then guide a second example together. Keep it global and egalitarian: use needs and tools from many lives — a water carrier, a sunshade, a basket, a pump — so no single, wealthy, modern home is the default; design is a human skill, not a store-bought one. A light values thread: a good design meets a need for someone — ask “who does this help, and who is left out?” Honor every body: describe the chart aloud for a learner who is blind or has low vision; a non-speaking learner points to a step or draws the idea; acting out the steps works for learners who learn best by moving.
Procedure
- Gather (5 min). Every tool you have ever used — a spoon, a bag, a door — was designed: someone noticed a need and made something to meet it. Today you learn to do that thinking.
- Meet design (10 min). Design is making something to meet a need. The steps: find the need, imagine ideas, choose and make, test, improve. Follow the worked example: the need is lifting grain quickly; the idea is a curved cup on a handle; then you make it, test it (“does it hold the grain?”), and improve it (“make the cup deeper”).
- Name the steps together (8 min). For a second need — carrying water a long way — name each step with a partner: what is the need? what could you make? how would you test it? how could you improve it?
- Your own need and one step (12 min). Pick a need from your own life (or from the list). Draw your idea for a tool that could meet it, and write or say one design step and why it matters — for example, “I would test it by seeing if it holds water.”
- Share (5 min). Show your idea to a partner. Can they tell what need it meets? Name your one design step for them.
- Close (5 min). Designing is a loop, not a one-time answer: you try, test, and improve. Anyone can design, because everyone notices needs.
Differentiation
- Support: Name the need and one step together aloud using the chart and the frame “My tool meets the need to ___, and one step I would take is ___.”
- Blind/low vision: Hear each step described and say the need and one step by voice; a partner scribes or models the idea.
- Deaf/hard of hearing / non-speaking: Point to the design step on the chart or draw the idea and label one step with pictures.
- Motor differences: Direct a partner’s hands to draw while the learner says or points to the need and the one design step.
- Extension: Describe a second need and two design steps, or explain how you would improve your own first idea after testing it.
Assessment
- Formative (observation): Can the learner explain that designing means making something to meet a need, and describe at least one step in designing?
- Artifact (portfolio): The learner’s need-and-idea drawing with one design step labeled.
Home connection
At home, notice one need — something that is hard or slow to do. Tell a grown-up what tool you would design to meet it, and name one step you would take (imagine, make, test, or improve).
Resources
- TeachEngineering, “Engineering Design Process” — the steps of defining a problem, imagining solutions, making, testing, and improving, the same loop learners meet here. https://www.teachengineering.org/populartopics/designprocess