Lesson 09 — The Make-and-Improve Cycle
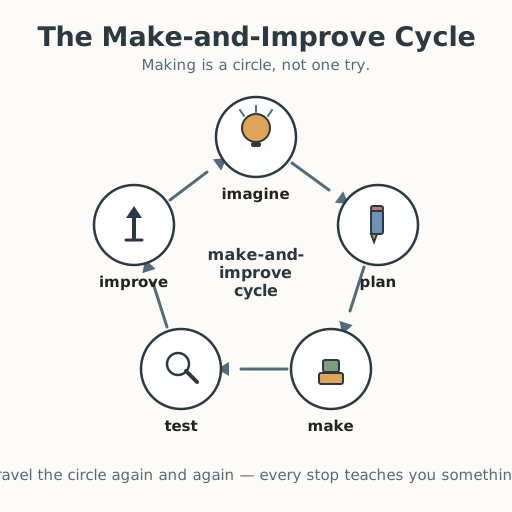
Learners run the full make-and-improve cycle — imagine, plan, make, test, improve — on one build, seeing the loop as a single repeating shape. Making is not one shot; it is a circle you can travel again and again.
Objectives
Objectives
- D07.S4.01.01 Build something with a simple plan in mind and tell what it is for.
- D07.S4.01.02 Test what they made and change one thing to make it work better.
Essential question
How do I move through imagine, plan, build, test, and improve — all in one loop?
Key vocabulary
Materials
Standard materials
- A full set of building materials · per group Blocks, boxes, cups, tape, string, cloth, and found parts
- A simple cycle chart · 1 Five pictures or words in a loop — imagine, plan, make, test, improve
Low-tech / no-cost
- Found materials and the ground Sticks, stones, leaves, mud, and sand — everything needed for the whole cycle
- A cycle drawn in the dirt Draw a circle and mark the five steps with a stick
Enriched / lab & device
- A picture of a real maker's cycle · 1 set A potter, a boat-builder, or a weaver's steps from idea to finished work
- A simple timer · 1 per group To spend a set time on each step of the cycle
Works in different contexts
- large-group Walk the whole class through one shared cycle on one build, naming each step aloud, then let small groups run their own cycle
- multi-age Older learners narrate the steps of the cycle while younger learners do them; switch who narrates and who builds
- self-directed A learner moves through all five steps on their own, then tells a grown-up or recording what happened at each step
- level-grouped Some learners follow the cycle with one simple build; others run two cycles and compare; match the challenge
- outdoor-only Run the whole cycle outside with nature's materials, marking each step on the ground as you go
Lesson 9 — The Make-and-Improve Cycle
Summary
Learners put the last two lessons together into one cycle: imagine, plan, make, test, improve — and then travel the loop again. They discover that making is not one try but a circle, and that every maker everywhere moves through these same steps.
Objectives
- Build something with a simple plan in mind and tell what it is for. (D07.S4.01.01)
- Test what they made and change one thing to make it work better. (D07.S4.01.02)
Connection
Think of a potter shaping a bowl, a boat-builder fixing a leak, a cook tasting a stew and adding salt. Each one is doing the same circle: imagine what to make, plan how, make it, test it, and improve it — then around again. The cycle has no “wrong” stop on it; every stop teaches you something. Today you will travel the whole circle on one build.
Materials
- A full set of building materials (blocks, boxes, cups, tape, string, cloth, found parts)
- A simple cycle chart: imagine → plan → make → test → improve
Preparation
- Set out a full set of materials so learners can change and re-change their builds.
- Display the cycle chart (or plan to draw it) where everyone can see the five steps.
Facilitator note
This lesson is written to the learner (“you”) so it works in a classroom and for a self-directed learner. The cycle is a skill structure, so model it explicitly once — you imagine aloud, plan aloud, build, test, improve — before learners run it themselves (Kirschner, Sweller & Clark, 2006). Keep the five steps as pictures or spoken words; reading and writing are not required. Let learners travel the loop at their own speed — some will go around once, some several times; both are complete. Treat “improve” as a step that always exists, not a sign of earlier failure. A learner with limited fine motor narrates the cycle and directs a partner who builds. A learner who is blind or has low vision travels the cycle by feel and spoken steps; the cycle chart can be made tactile — a string circle with a stone marking each step. Honor every journey around the circle.
Procedure
- Gather (5 min). Look at the cycle chart. These five steps are a circle: imagine, plan, make, test, improve. Makers everywhere travel this circle.
- Imagine and plan (10 min). Think of something to build and what it is for. Say or sketch your plan. What will hold it up? What is its job?
- Make (10 min). Build it. Work from your plan, and let the plan change as you learn.
- Test and improve (10 min). Try the job and watch. Change one thing to make it work better, then test again. You have now traveled the whole circle once.
- Travel again (10 min). Go around the circle again — improve one more thing, or start a new imagine-and-plan for a better build. The circle never has to stop; it is how things keep getting better.
- Close (5 min). Remember: making is a circle, not a single try. Every stop on the circle taught you something, and your build is yours.
Differentiation
- Support: Guide one full cycle step by step, saying each step’s name as the learner does it (“now we test — what happened?”).
- Support (fine motor): The learner narrates and decides while a partner builds.
- Support (non-speaking): Point to each step on the chart as the learner reaches it, and to the part changed.
- Support (blind/low-vision): Travel the cycle by feel and spoken steps; use a tactile chart (string circle and stones) to mark each step.
- Extension: Invite learners to run the cycle on a harder job (a bridge that holds a heavier stone) and tell which step taught them the most.
Assessment
- Formative (observation): Does the learner travel the cycle — planning a build, telling its purpose, testing it, and changing one thing to improve it?
- Artifact (portfolio): A note, drawing, or photo of the build and the change made, kept in the portfolio.
Home connection
At home, choose a small making job and travel the circle with a grown-up: imagine, plan, make, test, improve. Tell them which step was your favorite.