Lesson 08 — Testing and Improving
Learners test what they made, watch what happens, and change one thing to make it work better. A test that shows a problem is not failure — it is information, and "not yet" is the beginning of improving.
Objectives
Objectives
- D07.S4.01.02 Test what they made and change one thing to make it work better.
Essential question
How do I test what I made and change one thing to make it work better?
Key vocabulary
Materials
Standard materials
- A build from last time (or a fresh one) · 1 per learner or pair The structure to test and improve
- A way to test it · per group A small weight, a rolling ball, water, or a toy to try the job
- Extra building materials · per group More blocks, tape, string, or found parts to make changes
Low-tech / no-cost
- The build and a test from nature A leaf to float, a stone to weigh, a stick to span — test with what is near
- Hands and eyes Try the job and watch what happens; that is a test too
Enriched / lab & device
- A stronger building set · 1 set per group Connectors that make changes easier and sturdier
- A camera to record before and after · 1 per group Photograph the build, then the improved build, to see the change
Works in different contexts
- large-group Have teams test their builds one at a time while others watch and cheer; record each "change one thing" aloud
- multi-age Older learners help ask "what could you change?" while younger learners make the change and test again
- self-directed A learner tests their build, watches what happens, changes one thing, and tests again, then tells what changed
- level-grouped Some learners change one thing with a prompt; others find the change themselves; match the challenge
- outdoor-only Test leaf boats in a puddle, stick bridges with a stone, stone towers with a nudge — change one thing and test again
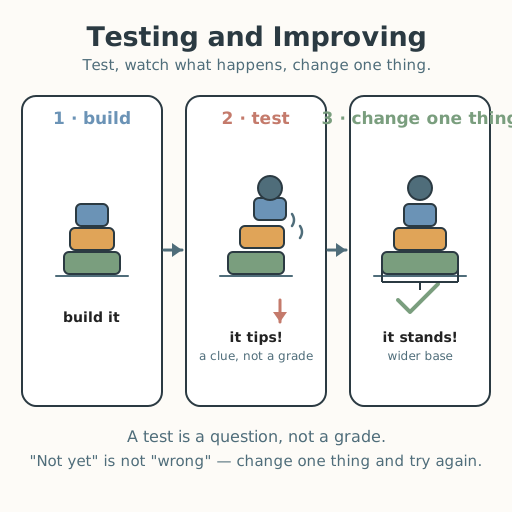
Lesson 8 — Testing and Improving
Summary
Learners test something they built, watch what happens, and change one thing to make it work better. They learn that a test is a question you ask your build — and a build that doesn’t work yet is not a failure, but a clue.
Objectives
- Test what they made and change one thing to make it work better. (D07.S4.01.02)
Connection
Think of a door that sticks, or a bridge that sways, or a basket that tips over. Builders everywhere test what they make, watch what happens, and change one thing to make it work better — a smoother hinge, a stronger beam, a wider base. Testing is not about being wrong; it is how things get better. Today you will test your build and change one thing to improve it.
Materials
- A build from last time (or a fresh one)
- A way to test it (a small weight, a rolling ball, water, or a toy)
- Extra building materials
Preparation
- Have learners’ builds (or fresh materials) ready.
- Set up a safe way to test each kind of build (a puddle for boats, a ramp for balls, a weight for towers).
Facilitator note
This lesson is written to the learner (“you”) so it works in a classroom and for a self-directed learner. Frame every test as a question, not a verdict. When a build falls or tips, say “interesting — what does that tell us?” and guide the learner to one change. Protect the culture of “not yet”: there are no broken ideas, only builds that are not finished improving. Celebrate the change as much as the result. A learner with limited fine motor can decide the change and have a partner carry it out — deciding is building. A learner who is blind or has low vision tests by feel and sound — feel the wobble, hear the splash, the thud, or the silence — and a partner or grown-up describes what happened. Keep tests gentle and safe so no one fears the “test” itself.
Procedure
- Gather (5 min). Bring the thing you built. Today you will find out if it does its job — that is a test.
- Test it (10 min). Try the job: does the tower stand when you add a weight? Does the boat float? Does the bridge hold a stone? Watch carefully what happens. What you see is a clue, not a grade.
- Notice the problem (5 min). What happened? Did it lean, tip, fall, or sink? Say or point to the part that needs help. A test that shows a problem is information — the best kind.
- Change one thing (15 min). Choose one change to make it work better — a wider base, a tighter join, a lighter top, a stronger side. Make the change, then test again. Did it help? If not yet, that is fine — change one more thing and try again.
- Share your change (10 min). Tell a friend or grown-up the one thing you changed and what happened when you tested again.
- Close (5 min). Remember: “not yet” is not “wrong.” Testing and changing is how everything good gets made — one try at a time.
Differentiation
- Support: Offer one clear test and one clear change (“it tips — let’s make the base wider”), and test again together.
- Support (fine motor): The learner decides the change and a partner makes it.
- Support (non-speaking): Point to the part to change and show the test result with a gesture (thumbs, or a shake of the head).
- Support (blind/low-vision): Test by feel and sound; a partner describes what happened, and the learner decides the change.
- Extension: Invite learners to change one thing, test, and keep improving until the job works, telling the story of each change.
Assessment
- Formative (observation): Does the learner test their build and change one thing to make it work better, telling (or showing) what they changed?
Home connection
At home, find something that almost works — a wobbly chair, a leaky cup, a tilted shelf. With a grown-up, change one thing to make it work better, and test it again.