Lesson 08 — Friction — The Slow-Down Force
Learners discover friction: the force that slows things down when two surfaces rub. They slide a car and a stone on smooth and rough surfaces, rub their hands to feel friction's warmth, and see that rough surfaces make more friction while smooth ones make less. They learn friction is both a helper (grip, brakes) and something we sometimes want less of (oil, ice, wheels) — and that the fair test from Lesson 1 was friction all along.
Objectives
Objectives
- D06.S3.03.02 Explain that a push or pull (force) changes an object's motion, and describe friction.
Essential question
What is friction, and how does it slow things down?
Key vocabulary
Materials
Standard materials
- A toy car or block on two surfaces · per pair A smooth surface and a rough one, to feel friction slow things down
- Hands to rub together · per learner Rub your palms — feel friction warm them
- Paper and crayons · per learner
Low-tech / no-cost
- A stone or seed on two grounds Slide it on smooth ground and rough ground and feel the difference
- Your own hands and a partner Rub palms together — friction is the rub that warms and slows
Enriched / lab & device
- A ramp with three surfaces (smooth, rough, carpet) · 1 To race a car down and see friction slow each one differently
- A "friction helps, friction hinders" chart · 1 Two columns for where friction is useful (grip, brakes) and where we want less (slides, ice, oil)
Works in different contexts
- large-group Race the car on two surfaces as a whole-group demo, then pairs feel friction and record which surface slowed it more
- self-directed A learner slides a found object on two surfaces and writes or draws which one slowed it more and why
- outdoor-only Slide a stone on smooth rock and rough sand, and feel the rub of your hands — friction in two places at once
- multi-age Older learners run the ramp race and read the results while younger learners slide and describe what they feel
- level-grouped Learners who can connect friction to real uses (brakes, cleats, oil) do so; learners still learning name just rough-versus-smooth
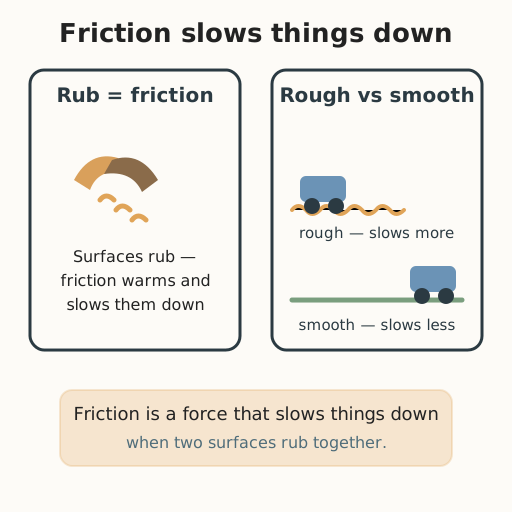
Lesson 8 — Friction: The Slow-Down Force
Summary
Why does a rolling car eventually stop on its own? Friction. Learners discover that friction is a force that slows things down when two surfaces rub together. They slide a car and a stone on smooth and rough surfaces, rub their hands to feel friction’s warmth, and learn the rule: rough surfaces make more friction, smooth ones make less. They see friction as a helper (grip and brakes) and something we sometimes want less of (oil, ice, wheels) — and they realize the fair test from Lesson 1 was about friction all along.
Objectives
- Explain that a push or pull (force) changes an object’s motion, and describe friction. (D06.S3.03.02)
Connection
Rub your hands together fast. Feel that warmth and that little drag? That is friction — the force that slows things down when two surfaces rub. It is why a car rolls far on smooth ice and stops sooner on rough sand, why your shoes grip the path, and why a bicycle can brake. The same force that wears down a stone also keeps you from slipping. You already tested it in Lesson 1 — smooth versus rough — you just did not know its name yet.
Materials
- A toy car or block on two surfaces (one smooth, one rough)
- Hands to rub together
- Paper and crayons
Preparation
- Set up the two surfaces so every pair can slide a car or block on both.
- Recall the Lesson 1 ramp test as the hook — the “smooth versus rough” question was a friction question.
Facilitator note
This lesson is written to the learner (“you”). Introduce friction concretely first — rub hands, slide a car on two surfaces — then name it (concrete before abstract). Model once (worked example: “the car stops sooner on the rough mat — more friction”), then let pairs explore. Two honest, age-appropriate truths to hold together: friction is useful (walking, gripping, braking) and friction can wear things down (soles, stone, machinery) — so people sometimes reduce it with oil, wheels, or ice. Keep the technology lens light and neutral: these are tools people invented to manage friction, not to fear it. Note that “friction” is the name scientists give to what everyone’s hands already know; the felt experience and the word are the same truth. This lesson answers the open question left in Lesson 7 (“why does the car stop on its own?”), completing the forces arc.
Procedure
- Gather and remember (5 min). In Lesson 1 you asked: does the car roll farther on smooth or rough? Today you learn the name of what made the difference: friction.
- Feel friction (10 min). Rub your hands together — that warm drag is friction. Slide the car first on the smooth surface, then on the rough one. Which slowed it more? Rough surfaces make more friction; smooth surfaces make less.
- Friction helps, friction hinders (15 min). Friction is a helper: your shoes grip the path so you do not slip, and brakes stop a bicycle. Sometimes we want less friction: a slide is polished smooth, skates glide on ice, and machines use oil to run easier. Sort the examples together: where does friction help, and where do we want less of it?
- Draw friction (10 min). Draw one place friction helps you and one place you want less of it. Label each with “more friction” or “less friction.”
- Close (5 min). Friction is the quiet force that slows, grips, and wears. Rough makes more, smooth makes less — and now you know the name for what you tested on day one.
Differentiation
- Support: Slide a car on two surfaces with a partner and say which one “slowed it more.”
- Support (non-speaking): Point to the surface with more friction; a partner says the word.
- Support (blind/low-vision): Rub hands and feel two surfaces (smooth stone, rough cloth) and describe which one grips more.
- Support (motor): Direct a partner to slide the car on each surface and rub their hands while you name which surface makes more friction.
- Extension: Explain why wheels, oil, or ice reduce friction, and name one machine that uses each idea.
Assessment
- Formative (observation): Can the learner describe friction as a force that slows things down and say whether rough or smooth makes more of it?
- Artifact (portfolio): The “friction helps / less friction” labeled drawing.
Home connection
At home, slide a spoon or a shoe on two different surfaces — a table and a carpet — and tell a grown-up which one had more friction. Feel the rub of your hands too.
Resources
- BBC Bitesize (KS2), “What is friction?” — friction as a force that slows things down when surfaces rub, and how we use and reduce it. https://www.bbc.co.uk/bitesize/topics/zvr3nrd/articles/zxqrdxs