Lesson 01 — Placing Our Local Landmarks on a Timeline
Learners place local events or landmarks on a timeline in order and — for the first time — explain *how they know* the order is correct, using clues such as a photo, a memory, or a date. This is the Grade 3 upgrade of the historian's ordering skill.
Objectives
Objectives
- D08.S1.03.01 Place local events or landmarks on a timeline in order and explain how they know the order is correct.
Essential question
How do I place local events or landmarks on a timeline in order, and how do I know the order is correct?
Key vocabulary
Materials
Standard materials
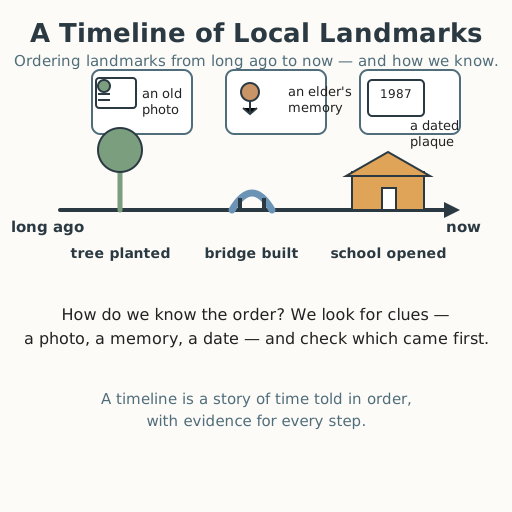
- A long timeline strip · 1 per learner A left-to-right line with a "long ago" end and a "now" end, with three or four empty spots
- A set of "local landmarks" cards for the worked example · 1 set Simple drawn cards — a tree planted, a bridge built, a school opened — plus a clue card for each (a photo, an elder's memory, a dated plaque)
- Pencils and crayons · per learner For drawing the landmarks and writing the clues
Low-tech / no-cost
- Found objects in a line A stone, a seed, a leaf — one object stands for each landmark, laid in a line on the ground with the clue said aloud
- Body and voice Walk the timeline outside, stopping at each landmark spot in order and naming the clue that proves the order
Enriched / lab & device
- Real photos or a map of local landmarks · 1 set Optional — actual photographs (an old school, a bridge, a market) or a local map to place on the timeline
- A tablet or camera · 1 per group Optional — photograph the finished timeline as a portfolio record
Works in different contexts
- large-group Build one big floor timeline together; the whole group calls out the clue while one learner places each landmark in order
- self-directed The learner draws or lays out three or four local landmarks in order alone, writes or says the clue for each, then shares with a grown-up or peer
- outdoor-only Lay the timeline on the ground with found objects and walk it from "long ago" to "now," naming each landmark and its clue as you step
- multi-age Older learners read the clue cards aloud and scribe, while younger learners place the landmarks and act out each one
- level-grouped Learners who grasp ordering quickly coach others by asking "what is your clue? how do you know this came first?" rather than telling
Lesson 1 — Placing Our Local Landmarks on a Timeline
Summary
Learners build a timeline — a line that orders events from the past toward today — and place three or four local landmarks on it in order. The new skill this year is the why: learners name the clue (evidence) that tells them the order is correct — an old photo, an elder’s memory, a dated plaque, a story. This is the first real historian’s question at Grade 3: not just what came first, but how do we know?
Objectives
- Place local events or landmarks on a timeline in order and explain how they know the order is correct. (D08.S1.03.01)
Connection
You already know a day has an order — wake, eat, play, rest — and that a timeline lines up bigger events from before today. Your town or village has its own order of landmarks: a tree someone planted, a bridge that was built, a school that opened. Each one carries a clue about when it happened — a photo, a date carved on a plaque, a grandparent’s memory. Placing them in order and naming the clue is how people begin to tell the true story of a place.
Materials
- A long timeline strip (one per learner)
- A set of “local landmarks” cards for the worked example, each with a clue card
- Pencils and crayons
Preparation
- Draw or gather simple landmark cards: a young tree being planted, a bridge being built, a school opening. Give each a clue card: an old photo (the tree was small and new), an elder’s memory (“I remember crossing the river on a boat before the bridge”), a dated plaque (“School, built 1987”).
- Give each learner a timeline strip with a “long ago” end and a “now” end.
- Decide whether the line reads left-to-right or top-to-bottom, and keep it the same for everyone.
Facilitator note
This lesson is written to the learner (“you”). Ordering is a foundational skill, so teach it with a worked example first (Kirschner, Sweller & Clark, 2006): model placing three landmarks on the line, and for each one say the clue — “the photo shows the tree when it was small, so the tree was planted first; the plaque says the school was built in 1987, so it came later.” Then guide the same two moves for a second set before learners work independently. The evidence is the point of this grade: Grade 2 ordered events; Grade 3 adds “how do you know?” — a photo, a date, a memory, a building style. Keep landmarks local, real, and gentle (a tree, a bridge, a school, a market, a well), never frightening or private. Honor every body and every family shape: a learner who is blind or has low vision sequences real objects by touch and says or signs the order and the clue; a learner who does not use a speaking voice points or acts. Every place’s order of landmarks is real and worthy — a town, a village, a farm, or a settlement all have their own. Remember that different peoples mark time in different ways (many calendars, many ways of naming years) — a timeline is one tool among many, not the only truth about time.
Procedure
- Gather and remember (5 min). Think of one thing in your town or village that has been there a long time, and one thing that is newer. Which came first? How do you know?
- Meet the timeline and the clue (10 min). Look at the worked example: a line with a “long ago” end and a “now” end. Three landmarks — a tree planted, a bridge built, a school opened. For each one, name its clue: the old photo shows the tree when it was small; the elder remembers crossing by boat before the bridge; the plaque reads “built 1987.”
- Guided practice (10 min). Mix the cards. Together, put them back in order, and for each say the clue that proves it: “The tree came first because… the school came after the bridge because…”
- Build your own timeline (15 min). Choose three or four real landmarks from your place. Draw or show each one on its spot along your line, from “long ago” to “now,” and write or draw the clue that tells you the order.
- Explain your order and your clue (5 min). Point to each landmark and say, “This came first because…” and “I know because…” You may point, act, draw, or sign.
- Close (5 min). You just did what historians do: you ordered landmarks and explained how you know. A timeline with evidence is a true story of time.
Differentiation
- Support: Use only three landmarks, and place them together with clear gestures toward each clue.
- Support (blind/low-vision): Sequence real objects by touch and say or sign the order and the clue aloud; a partner reads the labels.
- Support (non-speaking): Order picture cards or objects and point to the clue cards instead of speaking.
- Support (Deaf/HH): The cards are already pictures — read the order with your eyes and hands, and sign “before,” “after,” and “clue” as you place each card.
- Support (motor-difference): Use a large, stable line and bigger cards; point or eye-gaze to each spot while a partner moves the card.
- Extension: Add a fifth landmark and name two different kinds of clue (a memory and a date), and tell which is more trustworthy for that landmark and why.
Assessment
- Formative (observation): Can the learner place three or four local landmarks on the timeline in a sensible order, from furthest back to most recent?
- Formative (oral/performance): Does the learner name a clue (photo, memory, date, story) that shows how they know the order — by speaking, signing, pointing, or acting?
Home connection
At home, ask someone to tell you about two or three landmarks in your place and how they know which is older — a photo, a memory, a date. Put them in order together and say the clue for each.
Resources
- Britannica Dictionary, “landmark” — defines a landmark as an object or structure on land that is easy to see and recognize (and, historically, a building or place that was important in the past), supporting the idea of local landmarks as markers in a place’s story. https://www.britannica.com/dictionary/landmark