Lesson 06 — Our Ecosystem Diagram
Learners bring the living-world strand together in one labeled diagram. They draw an ecosystem — living and nonliving parts, the arrows of dependence between them, and at least one animal adaptation — then self-check their work against a short checklist. This diagram is a portfolio artifact: one picture that shows how adaptations, ecosystems, and dependence fit together.
Objectives
Objectives
- D06.S2.04.01 Describe how animals' body parts and behaviors help them survive in their environment.
- D06.S2.04.02 Explain how living and nonliving things in an ecosystem depend on each other (such as soil, water, and sunlight).
Essential question
How can I show, in one diagram, that living and nonliving things — and animals' adaptations — all depend on each other?
Key vocabulary
Materials
Standard materials
- Large paper and crayons or colored pencils · per learner For drawing a labeled ecosystem diagram
- Example ecosystem diagram · 1 A shared example to model the parts and arrows
- The card sets from Lessons 4 and 5 · 1 set each Animal cards and ecosystem cards to reuse while planning
Low-tech / no-cost
- Paper and a pencil, or the ground and a stick Draw the diagram on paper, or in smoothed dirt or sand outdoors
- Found labels (pebbles, leaves, twigs) Use found objects to mark each part of the diagram if paper is scarce
Enriched / lab & device
- A diagram checklist · per learner A checklist — at least two living parts, two nonliving parts, one adaptation, and arrows — to self-check the diagram
- A tablet or camera · 1 per group To photograph real ecosystem parts to copy or label
Works in different contexts
- large-group Build the example diagram together first, then learners each draw their own with the same checklist
- self-directed A learner draws their ecosystem from memory or imagination, labels living and nonliving parts, adds one adaptation, and checks the checklist
- outdoor-only Draw the diagram of a real place outdoors — label the plants, animals, soil, water, and sunlight you can see
- multi-age Older learners write the labels and explanations; younger learners add the drawings and point to the parts
- level-grouped Learners still learning label living and nonliving parts; learners who can extend add two adaptations and a "what if one part is missing" note
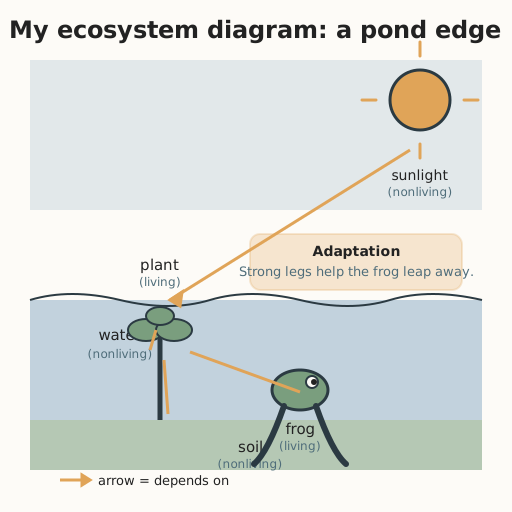
Lesson 6 — Our Ecosystem Diagram
Summary
Lessons 4 and 5 gave learners two living-world ideas — adaptations (body parts and behaviors that help survival) and ecosystems (living and nonliving things depending on each other). Now they join them into one labeled diagram. Learners draw an ecosystem with living and nonliving parts, arrows showing who depends on whom, and at least one animal adaptation, then self-check against a short checklist. The finished diagram becomes a portfolio artifact — one picture that shows how the living world fits together.
Objectives
- Describe how animals’ body parts and behaviors help them survive in their environment. (D06.S2.04.01)
- Explain how living and nonliving things in an ecosystem depend on each other (such as soil, water, and sunlight). (D06.S2.04.02)
Connection
A map helps a traveler see a whole place at once. A diagram does the same for ideas. When you draw a pond with its plants, its frog, its soil, and its sunlight, and you draw arrows from the frog to the plant it eats and from the plant to the sun that feeds it, you have made a picture of dependence that anyone can read. Adding the frog’s strong legs shows how its body helps it survive there. Diagrams are how people everywhere — farmers planning a field, fishers reading a coast, doctors mapping a body — put the pieces together so others can understand.
Materials
- Large paper and crayons or colored pencils
- The example ecosystem diagram
- The animal and ecosystem card sets from Lessons 4 and 5
Preparation
- Display the example ecosystem diagram where everyone can see it.
- Have the card sets ready for planning.
- Prepare the diagram checklist (or write it on the board): living parts, nonliving parts, arrows, and an adaptation.
Facilitator note
This lesson is written to the learner (“you”). It is a synthesis lesson, so use a worked example first — draw one diagram together on the board, pointing to each part, arrow, and label — then let learners draw their own (guided practice) and self-check against the checklist. Feedback is built in three ways: the checklist (self), a partner-check (peer), and your glance (observation). Keep the egalitarian lens: the diagram must show that the nonliving parts and the small creatures matter as much as the big ones — a worm or a patch of soil belongs in the picture as much as a lion. Encourage ecosystems from many places (a rice paddy, a coral reef, a desert, a city park) so every learner can draw a home that is theirs (global lens). This artifact is kept for the unit portfolio; celebrate each diagram, and let a learner who is not finished return to it — “not yet” is information, never a verdict.
Procedure
- Gather and remember (5 min). You have two ideas: adaptations and ecosystems. Today you will show both in one picture — a diagram.
- Watch the example (10 min). Look at the example diagram. Point to a living part, a nonliving part, an arrow showing dependence, and an adaptation. Say what each arrow means: “The frog depends on the plant.”
- Plan your diagram (10 min). Choose an ecosystem you know or can imagine — a pond, a field, a forest, a reef, a garden. List what you will draw: at least two living parts, two nonliving parts, and one adaptation.
- Draw and label (20 min). Draw your ecosystem. Label each part living or nonliving. Draw arrows to show who depends on whom. Label one animal’s adaptation and write how it helps it survive.
- Check your work (10 min). Use the checklist: living parts? nonliving parts? arrows? an adaptation? Swap with a partner and ask: can they follow your arrows? Close by remembering: every part of the web matters.
Differentiation
- Support: Draw a three-part diagram (plant, water, sun) with a partner, and label “living” and “nonliving” aloud.
- Support (non-speaking): Draw the parts and point to the dependence arrows; a partner writes the labels.
- Support (blind/low-vision): Build the diagram with found objects (a leaf, a stone, a cup of water, a feather) and describe each part and arrow aloud.
- Extension: Add a second ecosystem and a note about what would happen if one nonliving part (the water) were removed from both.
Assessment
- Formative (observation): Does the diagram include living and nonliving parts, arrows of dependence, and one labeled adaptation?
- Self: The learner checks the checklist and marks anything they want to improve.
- Peer: A partner reads the arrows and confirms they make sense.
- Artifact (portfolio): The finished labeled ecosystem diagram, kept for the unit portfolio.
Home connection
At home, draw a quick diagram of one real place with a grown-up — the kitchen garden, the balcony, or the backyard — and add two arrows showing what depends on what.
Resources
- BBC Bitesize (KS2 Science), “How do ecosystems work?” — living and nonliving parts and how they link together. https://www.bbc.co.uk/bitesize/topics/z6wwxnb/articles/zbd4g7h