Lesson 01 — Depth in Art
Learners discover three tricks artists use to make a flat picture feel deep — overlapping, size, and placement — then create their own artwork that uses all three to show space.
Objectives
Objectives
- D07.S1.04.01 Create an artwork that shows depth or space by overlapping, size, or placement.
Essential question
How can I make a flat picture feel deep?
Key vocabulary
Materials
Standard materials
- Paper and drawing tools · per learner Crayons, colored pencils, or markers
- A few pictures that show depth · 1 set Landscapes, street scenes, or seascapes where near things look big and far things look small
Low-tech / no-cost
- Stick and sand, dirt, or dust Draw the three depth tricks on the ground with a stick or finger
- Real outdoor view Look down a path, road, or field and notice near things look big and far things small
Enriched / lab & device
- Camera or tablet · 1 per group Take a photo down a hallway or street and compare near and far objects
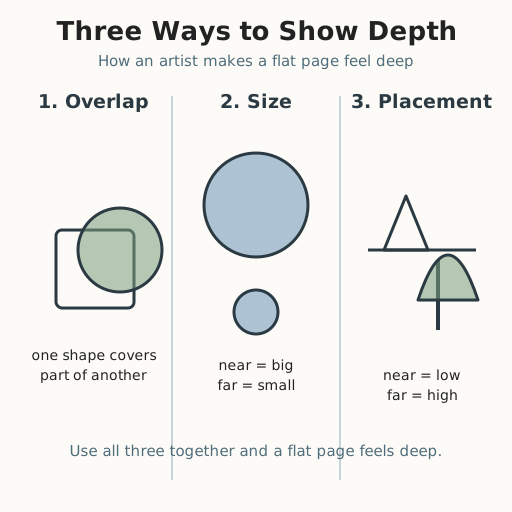
- Printed copies of the depth guide graphic · 1 per pair A reusable reference showing overlap, size, and placement
Works in different contexts
- large-group Draw the three tricks big on the board and model each; then learners make their own in small groups
- multi-age Younger learners use one trick at a time; older learners combine all three and add a horizon line
- self-directed A learner reads the three tricks, makes one artwork using all three, and checks their work against the guide
- outdoor-only Find a view with a path or road and draw it, showing near things big and far things small and high
Lesson 1 — Depth in Art
Summary
Learners discover that a flat page is not really flat to an artist. Three tricks — overlapping (one shape covers part of another), size (near things look big, far things look small), and placement (near things sit low on the page, far things sit high, near the horizon) — make a picture feel deep. Learners practice each trick, then make one artwork that uses all three.
Objectives
- Create an artwork that shows depth or space by overlapping, size, or placement. (D07.S1.04.01)
Connection
Stand at one end of a street, a path, or a field and look far away. The tree next to you looks big; the same kind of tree far down the road looks tiny. The road itself seems to get narrower the farther it goes. A flat picture has no real distance, so artists copy these clues onto the page — big and low for near, small and high for far, one thing tucked in front of another — and our eyes read it as depth. In a busy city, in a mountain village, or on the open sea, the same three tricks make a drawing feel like you could walk into it.
Materials
- Paper and drawing tools (crayons, colored pencils, or markers)
- A few pictures that show depth (landscapes, street scenes, seascapes)
Preparation
- Print or display the depth guide graphic and a few pictures that show depth.
- Have paper and drawing tools ready for each learner.
Facilitator note
This lesson is written to the learner (“you”). Showing depth is a skill, so model each trick as a worked example on the board — draw a circle in front of a square, a big tree and a small tree, a low tree and a high mountain — before learners try their own (Kirschner, Sweller & Clark, 2006). A learner who is blind or has low vision can feel depth in a collage: layered cut shapes (overlap), a big and a small shape (size), and a shape placed low or high on a page (placement) with a partner naming each. A learner with limited fine motor may direct a partner who places the shapes. The goal is that a viewer can name where each trick appears, not that the drawing is polished.
Procedure
- Gather (5 min). Last year you used pattern and mood in your art. Today you learn something new: how to make a flat page feel deep. Artists use three tricks.
- Meet the three tricks (10 min). Look at the guide graphic.
- Overlap: one shape covers part of another. The covered shape looks behind.
- Size: near things look big, far things look small.
- Placement: near things sit low on the page; far things sit high, near the horizon line where sky meets ground. Look at the example pictures and point to where you see each trick.
- Practice each trick (10 min). On your paper, try all three: draw a circle that overlaps a square; draw a big tree and a small tree; draw a low tree and a high mountain with a horizon line between them.
- Make your artwork (15 min). Make one picture — a street, a path, a harbor, a field, a room, anything you choose — that uses all three tricks to feel deep. Put your near things big and low, your far things small and high, and let some shapes overlap.
- Share and close (5 min). Show a partner. Can they point to your overlap, your size change, and your placement? Remember: a flat page can hold a whole deep world.
Differentiation
- Support: Offer a pre-drawn horizon line and three ready shapes (a big tree, a small tree, a mountain) to place; focus on one trick at a time.
- Support (blind/low-vision): Build depth as a collage of layered, different-sized shapes placed low and high, with a partner naming each trick.
- Support (fine motor): Direct a partner who places the shapes, or use big cut shapes instead of drawing.
- Extension: Add a middle-ground object between the foreground and background, and explain which trick each part uses.
Assessment
- Formative (observation): Does the learner’s artwork use overlap, size, or placement, and can they point to where each appears?
- Artifact (portfolio): The depth artwork (or a photo of it), kept in the portfolio.
Home connection
With someone at home, look down a real street or path together and notice what looks big and near versus small and far. Then draw it, using the three tricks you learned.
Resources
- The Metropolitan Museum of Art, Heilbrunn Timeline of Art History — essays on perspective and landscape: https://www.metmuseum.org/toah/