Lesson 01 — Plan an Artwork with a Clear Idea
Learners begin the unit by learning to plan an artwork the way a builder plans a house: they settle a clear idea, then choose materials and a technique that fit it. A worked example shows the three-part plan, learners write their own, and a partner checks that the plan is clear enough to follow next lesson.
Objectives
Objectives
- D07.S1.05.01 Plan and complete an artwork with a clear idea, choosing materials and techniques to fit the idea.
Essential question
How do I plan an artwork with a clear idea and choose materials and techniques to fit it?
Key vocabulary
Materials
Standard materials
- My Art Plan page · 1 per learner A page with three labeled boxes — my idea (with a small sketch space), materials I will use, technique I will try — plus a one-line "because"
- Sample artworks · 2–3 Finished artworks (made by the facilitator or past learners) whose idea, materials, and technique are easy to see
- Pencils and colored pencils · per learner
Low-tech / no-cost
- A folded paper planner Fold a sheet into three columns for idea, materials, technique; sketch and write with any pencil or charcoal
- Spoken plan Say the plan aloud to a partner — idea, materials, technique, because — with no page needed
Enriched / lab & device
- A class planning wall · 1 A shared board where learners post their idea, materials, and technique so the class can see many plans at once
- A digital planning page or camera · per group To sketch a plan digitally or photograph materials being considered
Works in different contexts
- large-group Model one full plan on the board (idea → materials → technique → because), then have learners complete their own page in pairs
- multi-age Younger learners plan with pictures and a spoken sentence; older learners write the "because" in one or two sentences
- self-directed A learner completes the three-box page alone, then checks by asking, "Would someone else understand my idea from my plan?"
- level-grouped Learners ready to extend plan two different material–technique pairs for the same idea and choose which fits better, explaining why
- outdoor-only Plan an artwork using found natural materials (leaves, stones, sand), describing the idea and technique aloud; no paper needed
Lesson 1 — Plan an Artwork with a Clear Idea
Summary
Learners begin the unit by learning to plan an artwork the way a builder plans a house: they settle on a clear idea, then choose materials and a technique that fit it. A worked example shows the three-part plan, learners write their own, and a partner checks that the plan is clear enough to follow next lesson.
Objectives
- Plan an artwork with a clear idea, choosing materials and techniques to fit the idea. (D07.S1.05.01)
Connection
A builder draws plans before the first brick is laid. A cook reads a recipe before the first vegetable is chopped. A gardener decides what to plant where before the first seed goes in. An artwork is the same: it begins not with the first stroke but with a clear idea — what you want to show — and then a choice of materials and a technique that fit that idea. A stormy sea calls for dark blues and smudged chalk; a bright market calls for warm colors and cut paper. Planning first is what turns a lucky accident into something you meant to make.
Materials
- My Art Plan page
- Sample artworks
- Pencils and colored pencils
Preparation
- Copy a “My Art Plan” page for each learner.
- Gather two or three sample artworks whose idea, materials, and technique are easy to name.
- Recall Grade 4: learners already showed depth and space and chose a subject and purpose; today they add a formal plan.
Facilitator note
This lesson is written to the learner (“you”). The idea to land is plan before you
make: a clear idea, then materials and a technique chosen to fit the idea. Model the
worked example aloud and in writing before learners begin (explicit instruction for a
novice skill — Kirschner, Sweller & Clark, 2006). Watch for the common slip of choosing
materials first (“I want to use glitter”) and then forcing an idea onto them; gently
redirect to “what do you want to show, and what will best show it?” The plan is a promise
to the learner’s future self; next lesson they carry it through. See
docs/facilitation.md on working through plans and docs/contexts.md on peer checking.
Procedure
- Gather (5 min). Think of something you have made before — a drawing, a fort, a kite, a meal you helped cook. Did you plan it first, or just start? Today you learn to plan an artwork the way a builder plans a house: idea first, then materials, then technique.
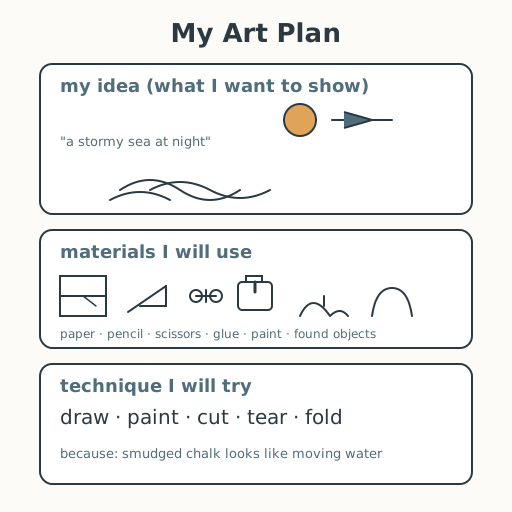
- Meet the plan (10 min). Here is a worked example. Idea: “a stormy sea at night.” Materials: dark blue and grey paper, chalk. Technique: smudge the chalk for the waves, tear the paper for the jagged rocks. Because: smudged chalk looks like moving water, and torn edges look like rough rock. Notice the order: the idea came first, and the materials and technique were chosen to fit it.
- Choose your idea (5 min). Pick one clear idea. It can be a place, a person, a feeling, a story moment — something you can say in one sentence and sketch small.
- Write your plan (15 min). Fill your “My Art Plan” page: write or sketch your idea in one sentence; list the materials you will use; name the technique you will try; finish with “because” — why these fit your idea.
- Partner check (10 min). Swap pages. Read your partner’s plan. Could you picture the artwork from it? Ask one clarifying question (“What will the background be?”). Tell them one thing about the plan that is already clear. This helps before, not after, the making.
- Close (5 min). A clear plan is a gift to yourself: tomorrow you will not wonder what to do — you will begin. Keep your plan safe; next lesson you make it real.
Differentiation
- Support: Offer a bank of idea starters and material/technique cards to choose from; scribe the “because” sentence while the learner dictates.
- Extension: Plan two different material–technique pairs for the same idea and write which one fits better and why.
Assessment
- Formative (observation/peer): Can the learner state a clear idea and name materials and a technique that fit it, with a “because”?
- Self-check: The learner asks, “Could someone else picture my artwork from my plan, and did I choose materials and technique to fit the idea — not the other way around?”
Home connection
Plan one small thing at home before you make it — a snack, a drawing, a tidy-up — and tell someone your idea, your “materials,” and why they fit.
Resources
- Explicit instruction with worked examples supports novice skill-building (Kirschner, Sweller & Clark, 2006). For an accessible classroom framing of planning before making, see The Metropolitan Museum of Art’s “How to look at art” prompts: https://www.metmuseum.org/art/online-features/metkids/