Lesson 07 — The Full Design Cycle: Research, Prototype, Test, Document
Learners run the full design cycle — research, prototypes, testing — to make something that solves a real problem, and document the whole process. A worked example walks the cycle on a real problem (seedlings drying out and being eaten), showing research before the first prototype, testing that leads to a better second prototype, and a journal that records every decision. Learners then run the cycle on a problem they choose, keeping a design journal as the portfolio artifact.
Objectives
Objectives
- D07.S4.06.01 Use a full design cycle, including research, prototypes, and testing, to make something and document the process.
Essential question
How do I use a full design cycle — research, prototypes, and testing — to make something, and document the process?
Key vocabulary
Materials
Standard materials
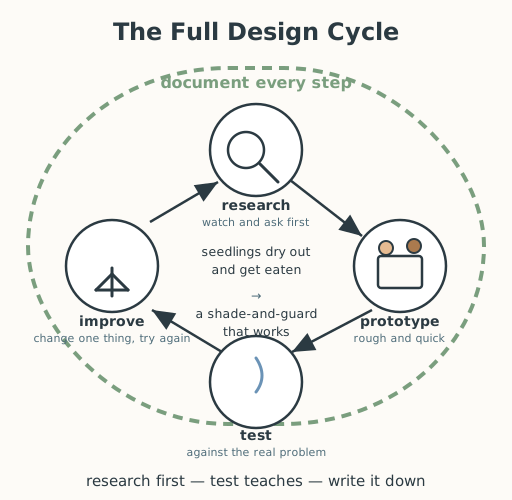
- Full design-cycle poster · 1 A poster showing the full cycle — research → prototype → test → improve, looping — with 'document' wrapping around every step, and a worked example (seedlings drying out and being eaten → a shade-and-guard that works)
- Design journal · 1 per learner A multi-page journal with boxes for each stage — the problem and who it affects, my research (what I saw and asked, what already exists), my first prototype sketch, my test and what happened, my improved prototype, and what I would do next
- Building materials · per group Cardboard, paper, tape, string, cloth, plastic bags, sticks, scissors, glue — enough for small prototypes
- Test setup · 1 Whatever the problem needs for testing — water, a weight, a fan, a slope, a real user to try it
Low-tech / no-cost
- Found and natural materials Sticks, stones, leaves, clay, cloth, and recycled containers — build with what the environment provides
- A spoken or drawn journal State each stage aloud to a partner or draw it in earth; no paper journal needed
Enriched / lab & device
- A photo or video log · 1 per group A camera or device to photograph each prototype and its test, documenting the whole cycle visually
- Simple tools and fasteners · per group A hole punch, paper fasteners, rubber bands, or a low-temperature glue gun (with supervision) for sturdier prototypes
Works in different contexts
- large-group Choose one shared class problem and run the cycle in small teams, each researching and prototyping a different approach, then compare what each team's tests showed
- multi-age Older learners lead research and documentation while younger learners gather materials and help build and test, everyone recording one journal entry
- self-directed A learner identifies a real problem, researches it (observing and asking), builds and tests at least two prototypes, and keeps a written journal of the whole cycle
- level-grouped Learners ready to extend run three full prototype-test-improve loops and write how each version changed from the last and why
- outdoor-only Solve a real outdoor problem — shade a seedling, keep water from pooling, carry gathered wood — with natural materials, and record the cycle in a drawn or spoken journal
Lesson 7 — The Full Design Cycle: Research, Prototype, Test, Document
Summary
Learners run the full design cycle — research, prototypes, testing — to make something that solves a real problem, and document the whole process. A worked example walks the cycle on a real problem (seedlings drying out and being eaten), showing research before the first prototype, testing that leads to a better second prototype, and a journal that records every decision. Learners then run the cycle on a problem they choose, keeping a design journal as the portfolio artifact.
Objectives
- Use a full design cycle, including research, prototypes, and testing, to make something and document the process. (D07.S4.06.01)
Connection
Every good fix begins not with a leap but with a look. A farmer watches where the sun falls and where the birds land before building a shade. A cook asks who will eat before changing a recipe. A student asks what is actually wrong with a chair before wedging paper under a leg. Research — watching and asking — comes first; then you build a rough prototype, test it, and make it better. And when you write the whole path down, your thinking becomes something others can learn from. Today you run the full cycle, start to finish, and keep the record.
Materials
- Full design-cycle poster
- Design journal
- Building materials
- Test setup
Preparation
- Print or draw the full design-cycle poster, including the worked example.
- Copy a design journal for each learner.
- Gather building materials and set up whatever the problem needs for testing.
- Recall Grade 5: learners designed and built something that solved a real problem and explained their choices; Grade 4: they designed for a specific user and gathered feedback.
Facilitator note
This lesson is written to the learner (“you”). The idea to land is the complete cycle
with documentation: research (watch and ask) → prototype (rough, quick) → test (against
the real problem) → improve (change one thing, try again) → document (write it down),
looping as needed. Model the worked example fully before learners begin (explicit
instruction for a novice skill — Kirschner, Sweller & Clark, 2006). Emphasize the two
grade-6 upgrades over grade 5: research comes first, and documentation turns a
build into a shareable record. Let the problem be real — the class or community should
actually have it — and let prototypes be rough; testing and improving are the learning.
Weave in the lenses: egalitarianism (ask “who is this for, and does it work for them?”),
environment (ask “what do the materials cost the Earth?”). The journal is the portfolio
artifact. See docs/facilitation.md and docs/contexts.md.
Procedure
- Gather (5 min). Last lesson you compared how two traditions tell the story of good against evil. Today you become designers, and you use the whole cycle — not just building, but researching, prototyping, testing, and documenting.
- Meet the cycle (15 min). Look at the poster. Here is a worked example. Problem: the seedlings in our garden dry out in the afternoon sun, and birds eat them. Research: watch when the sun hits (afternoon) and where the birds come from; ask the gardener; look at how others shade plants — a thatch frame, a cloth. Prototype 1: a paper shade on sticks. Test: does it shade the seedlings and let water through? The paper droops when wet. Improve: swap paper for cloth and angle it. Prototype 2: a cloth shade-and-guard. Test again: it shades, drains, and keeps birds out. Document: your journal holds every step — the problem, the research, both prototypes, both tests, and the “why” of each change. Notice: research came first, and documentation wraps every step.
- Research your problem (10 min). Choose one real problem in your class or community. Before building anything, research it: watch when and where it happens, ask who it affects, and look at how it is solved elsewhere. Write all of this in your journal.
- Prototype, test, improve (20 min). Sketch and build a first, rough prototype. Test it against the problem — with water, weight, wind, or a real user. Change one thing that didn’t work and build a second prototype. Test again. Write what happened each time.
- Document and share (5 min). Finish your journal so another person could follow your path from problem to fix. Share one line with a partner: the problem, one test, and one change you made because of it.
- Close (5 min). You just did what every engineer, craftsperson, and careful builder does: you looked before you built, you built rough first, you let testing teach you, and you wrote it down. Next lesson, the unit’s capstone, you will turn this same careful eye on the designed world around you.
Differentiation
- Support: Provide a pre-named problem and a small menu of materials with their properties (“cardboard = stiff; cloth = shades and drains”), and scribe the journal.
- Support (seated and fine-motor options): Build at a table at a comfortable height; offer larger, easier-to-grip materials; let a learner who finds cutting or fastening hard choose the materials, direct a partner’s hands, run the test, or keep the journal — the design thinking is the learning, not the cutting.
- Extension: Run three full prototype-test-improve loops and write how the third version differs from the first and why.
Assessment
- Portfolio (observation/performance/self): Does the journal show research before the first prototype, at least two prototypes with a test between them, and a documented reason for each change?
- Self-check: The learner asks, “Did I research before building, did testing change my second prototype, and could someone else follow my whole path from my journal?”
Home connection
Pick a small problem at home, research it for two minutes (watch and ask), try a first fix, test it, improve it once, and tell someone the whole path.
Resources
- The engineering design process (define, research, prototype, test, improve) is a core practice of K-12 engineering education; see the Smithsonian Science Education Center: https://ssec.si.edu/
- Kirschner, Sweller & Clark (2006), “Why Minimal Guidance Does Not Work,” on modeling worked examples for novice skills.