Lesson 01 — Digital & Mixed-Media Art: Combining Techniques
Learners make a hand-made element (a drawing, painting, or print), bring it into a free digital tool, and combine it with at least one digital technique — a color layer, a photo, or text — to create one mixed-media artwork. They reflect in writing on the choices the technology made possible, such as undo, layers, duplication, and sharing.
Objectives
Objectives
- D07.S1.09.01 Create a digital or mixed-media artwork that combines techniques and reflect on the choices technology made possible.
Essential question
How do I combine hand-made and digital techniques into one artwork, and what does the technology make possible?
Key vocabulary
Materials
Standard materials
- Paper, pencils, and one hand-made element (drawing, painting, or found-object print) · 1 set per learner The handmade base that will be scanned or photographed and combined digitally
- A device with a free image editor (Krita, GIMP, Inkscape, or any browser-based tool) · 1 per learner or pair Free and open-source tools keep the lesson accessible everywhere (S-440, S-441)
- Camera or scanner (a phone camera works) · 1 per pair To bring the hand-made element into the digital workspace
Low-tech / no-cost
- Paper, scissors, glue, and found materials A physical collage made of layered cut paper and found objects stands in for digital layers — the "layering" idea is the same
- A hand-drawn "layer" chart Draw three stacked sheets on one page to plan which element sits on top, middle, and bottom
Enriched / lab & device
- A drawing tablet or stylus · 1 per learner Allows direct digital drawing on top of the scanned layer
- A shared online gallery or class document · 1 To exhibit the finished pieces and read each other's reflections
Works in different contexts
- large-group Demonstrate the layer combination on one shared screen, then let learners work in pairs so devices go further
- multi-age Younger learners keep two layers (background + one element); older learners add a third and explain each layer's role
- self-directed A learner works through the step-by-step worked example in the Procedure and writes the reflection alone
- level-grouped Learners ready to extend experiment with a fourth layer or a blend mode and describe what it changed
- outdoor-only Collect found objects and press or rub them onto paper to build the physical layers; "scan" by tracing them onto a second sheet
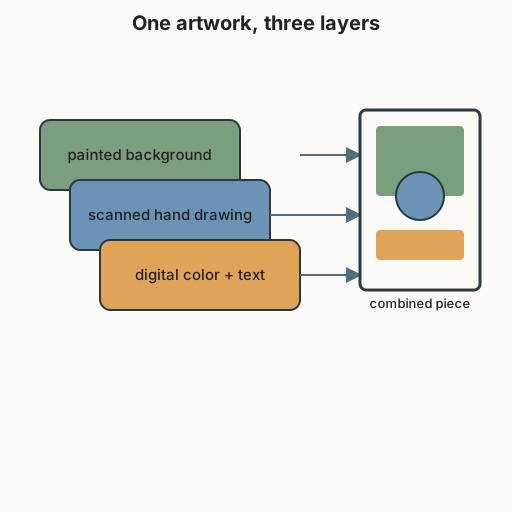
Lesson 1 — Digital & Mixed-Media Art: Combining Techniques
Summary
Learners make a hand-made element — a drawing, painting, or found-object print — then bring it into a free digital tool and combine it with at least one digital technique (a color layer, a photograph, or text) to produce one mixed-media artwork. They end by reflecting in writing on the choices the technology made possible. The unit opens here because making something of your own gives the rest of the unit — reading media, composing music, performing, and designing — a craft and a critical eye to build on.
Objectives
- Create a digital or mixed-media artwork that combines at least two techniques — one hand-made and one digital — and reflect on the choices the technology made possible. (D07.S1.09.01)
Connection
Think of the last picture you liked online. Almost none of it began and ended in one place: a photo was taken, then cropped, then a filter was added, then text was pasted on top, then it was shared. Every image is built in layers — and once you see the layers, you can build your own. A quilt, a mosaic, a page from a scrapbook, and a wall of street posters are all the same idea: parts placed over and beside each other to make one whole. Today you make one of those wholes yourself, with your hand and a screen working together.
Materials
- Paper, pencils, and one hand-made element
- A device with a free image editor (Krita, GIMP, Inkscape, or a browser-based tool)
- A camera or scanner (a phone camera is enough)
Preparation
- Confirm the free image editor is installed or loads in a browser; test it once yourself.
- Retrieval: from Grade 8, recall that a series of artworks explores one theme and that a critique separates observation (what I see) from judgment (what I value). Today we turn that into making with layers.
Facilitator note
This lesson is written to the learner (“you”). Its goal is one finished mixed-media piece plus a short written reflection — not technical mastery of a specific program. Keep the tools minimal and free so no learner is left out (the egalitarian lens): Krita and GIMP are raster editors and Inkscape is a vector editor, all open source (S-440, S-441). The worked example in the Procedure models the full pipeline before independent work, because combining techniques is a new skill and novices need explicit instruction first (Kirschner, Sweller & Clark, 2006; S-011). The ethics lens: when you borrow an image, a texture, or a tradition’s pattern, credit it and respect its license — the difference between learning from a tradition and taking it. The global lens: invite learners to draw inspiration from any living tradition they know (a kente cloth’s woven geometry, a rangoli’s symmetry, an ukiyo-e print’s flat color, a mural’s scale) as questions, not as patterns to copy without understanding. Keep the reflection honest: what did the tool let you do that your hand alone could not?
Procedure
- Plan the layers (5 min). Look at the layer diagram. An artwork can be one, two, or three layers stacked. Decide: what will be your bottom (a color wash, a painted background), your middle (a hand drawing or print), and your top (digital text, a shape, or a second image)?
- Make the hand-made element (15 min). Draw, paint, or print one element on paper — a face, an animal, a place you love, a symbol that matters to you. It does not need to be perfect; it needs to be yours.
- Bring it in (10 min). Photograph or scan your element and open it in the image editor. This is the worked example, so follow these steps as they are modeled: (a) create a new canvas, (b) add your photo as a layer, (c) add a second layer on top, (d) on that new layer, add one digital technique — a flat color, a shape, or a line of text.
- Combine and revise (15 min). Try what the tool makes easy: undo a mistake, move a layer, change the color, or duplicate an element. Make at least one revision you could not have made on paper.
- Reflect (10 min). Write three sentences: what layers you used, one thing the tool let you do that your hand could not, and one thing your hand gave the piece that the screen did not.
Differentiation
- Support: Provide a pre-made two-layer template (background + one empty layer) so the learner focuses on adding one element.
- Extension: Add a fourth layer or try a blend mode (multiply, overlay) and describe in one sentence what it changed about the mood.
- Access (blind / low vision): Build the layers as a texture collage — a different material for each layer (paper, cloth, sand, foil, string) so each layer is read by touch, and name each layer’s role out loud. The idea of “stacked layers” is tactile, not only visual.
Assessment
- Formative (observation + artifact): Does the piece combine at least one hand-made and one digital element? Does the reflection name a specific technological choice (undo, layers, color, duplication) rather than just “I used a computer”?
- Self-check: Can you point to each layer in your own piece and say what it contributes?
Home connection
Ask someone at home to show you one object made by combining materials — a quilt, a repaired pot, a collaged photo frame, a decorated doorway. What layers make it up?
Resources
- Krita — free, open-source digital painting: https://krita.org/ (S-440).
- Inkscape — free, open-source vector graphics: https://inkscape.org/ (S-441).
- On explicit instruction and worked examples for new skills: Kirschner, Sweller & Clark (2006), https://doi.org/10.1207/s15326985ep4102_1 (S-011).