Lesson 07 — Imagine, Plan, Make, Improve
Learners follow a four-step design process — imagine, plan, make, and improve — to build something that meets a simple need, and test it to see how it works. They discover that making is a loop, not a straight line, and that this loop is how everything people build gets better.
Objectives
Objectives
- D07.S4.03.01 Follow a simple design process of imagine, plan, make, and improve to build something that meets a need.
Essential question
How do I follow imagine, plan, make, and improve to build something that meets a need?
Key vocabulary
Materials
Standard materials
- A small pile of making materials · per learner or pair Paper, cloth, string, tape, boxes, sticks, cups, clay — things to build with
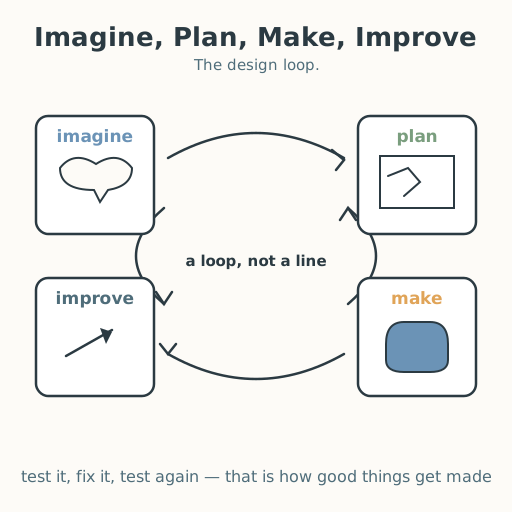
- A four-step design chart · 1 Four boxes labeled "imagine," "plan," "make," and "improve" with arrows between them
Low-tech / no-cost
- Found materials and the ground Sticks, stones, leaves, mud, sand — imagine, plan, make, and improve with what is near
- A plan told aloud or drawn in the dirt Say the steps, or scratch the plan in sand with a stick
Enriched / lab & device
- A picture of a real design loop · 1 set A maker's sketch, prototype, and improved version — to see the loop in real work
- A sketching sheet and pencil per learner · 1 per learner To draw the plan and the improvement
Works in different contexts
- large-group Walk one shared design loop together first — "we need a place for our pencils; imagine, plan, make, test, improve" — then let small groups run their own loop
- multi-age Older learners ask the loop questions ("what's the need? how will you improve it?") while younger learners answer and build; then trade
- self-directed A learner picks a need, imagines, plans, makes, tests, and improves it, and tells (or records) what they changed and why
- level-grouped Some learners follow a two-step loop (make, improve); others follow the full four-step loop; match the challenge
- outdoor-only Meet a need outdoors — a stick bridge over a puddle, a stone ring to hold a pot — and improve it after testing
Lesson 7 — Imagine, Plan, Make, Improve
Summary
Learners follow a four-step design process — imagine, plan, make, and improve — to build something that meets a simple need, and test it to see how it works. They discover that making is a loop, not a straight line, and that this loop is how everything people build gets better.
Objectives
- Follow a simple design process of imagine, plan, make, and improve to build something that meets a need. (D07.S4.03.01)
Connection
Everything around you that works well was once an idea that got tested and fixed and tested again — a shoe, a basket, a bridge, a pot. The maker first imagined it, then planned it, then made it, then improved it after trying it out. That four-step loop is called a design process. Today you will run the loop yourself to build something that meets a need.
Materials
- A small pile of making materials (paper, cloth, string, tape, boxes, sticks, cups, clay)
- A four-step design chart (imagine, plan, make, improve)
Preparation
- Gather a small pile of varied materials so learners have real choices.
- Display or draw the four-step design chart where everyone can see it.
Facilitator note
This lesson is written to the learner (“you”) so it works in a classroom and for a self-directed learner. The design loop is a skill, so model it once — “we need a pencil holder; I imagine a cup; I plan paper folded around a box; I make it; I test it and it tips over, so I improve it by adding a wider base” — before learners run their own loop (Kirschner, Sweller & Clark, 2006). The key idea is the loop: improve comes from testing, not from getting it right the first time. “Improve” can be one small change. The plan may change as the learner builds — that is the loop working. A learner with limited fine motor directs a partner who handles the materials — imagining, planning, and deciding the improvement are the heart of the task. A learner who does not speak points to the four boxes and to the change they made. A learner who is blind or has low vision plans by feel and names the steps aloud, and tests the build with their hands. Every loop belongs.
Procedure
- Gather (5 min). Look at the materials. Today you will design — build something that meets a need. First, pick a need: a holder for pencils, a bridge for a toy to cross, a stand to keep a book open, a cup to hold water. Say or point to your need.
- Imagine (5 min). In your mind (or aloud), picture what you could make to meet the need. That is step one: imagine.
- Plan (10 min). Before you build, say or draw your plan — what it will look like, what materials you will use, what you will do first. That is step two: plan.
- Make (15 min). Build your plan with the materials. It does not have to be perfect; it has to exist so you can test it. That is step three: make.
- Improve (10 min). Test it. Does it meet the need? If it tips, breaks, or falls short, change one thing to make it work better — a wider base, a stronger join, an extra fold. That is step four: improve. Test again.
- Share and close (5 min). Show what you made and tell (or point to) the need it meets and the improvement you made. Remember: imagine, plan, make, improve — that loop is how everything good gets built.
Differentiation
- Support: Offer one clear need (“make a place for the pencils”) and a two-step loop (make, then improve), and let the learner choose one material.
- Support (fine motor): The learner imagines, plans, and directs while a partner handles the materials.
- Support (non-speaking): Point to the four boxes and to the change made to improve.
- Support (blind/low-vision): Plan by feel, name the steps aloud, and test the build with the hands.
- Extension: Invite learners to run the loop twice, making a second improvement, and to tell how the second version is better.
Assessment
- Formative (observation): Does the learner follow imagine, plan, make, and improve to build something that meets a need, and identify the improvement they made?
- Artifact (portfolio): The built thing (or a photo) and the plan, kept in the portfolio.
Resources
- No external resources required; the design-loop claims here are about the learner’s own process, which they practice directly.
Home connection
At home, find a small need (a place for keys, a stand for a spoon) and run the loop with a grown-up — imagine, plan, make, improve — then test it together.