Lesson 07 — Creating a Character
Learners create an original character using voice, body, and a simple prop or costume piece, then perform it and explain what they chose to communicate. They learn that every choice — sound, posture, object — sends a message.
Objectives
Objectives
- D07.S3.04.02 Create a character using voice, body, and a simple prop or costume, and explain what they chose to communicate.
Essential question
How do I build a character with my voice, body, and a prop?
Key vocabulary
Materials
Standard materials
- A simple prop or costume piece per learner · per learner A scarf, hat, stick, bag, or piece of cloth
- Character planning page · per learner Boxes for voice, body, prop, and "what I want to communicate"
Low-tech / no-cost
- Voice and body only Create the character with sound, posture, and gesture; no prop needed
- A found object Use a leaf, a stone, a stick, or a scrap of cloth as the prop
Enriched / lab & device
- A simple costume box · 1 Hats, scarves, capes, and fabric pieces to choose from
- A recording device · 1 per group Record the character performance and watch it back to revise
Works in different contexts
- large-group Model one character as a worked example, then learners build their own in pairs and perform to small groups
- multi-age Older learners perform full characters; younger learners choose one tool (voice, body, or prop) and show it
- self-directed A learner chooses a character, plans voice-body-prop choices, performs alone or for a family member, and explains what they chose
- outdoor-only Use a stick, leaf, or stone as a prop and the open space for big body choices
Lesson 7 — Creating a Character
Summary
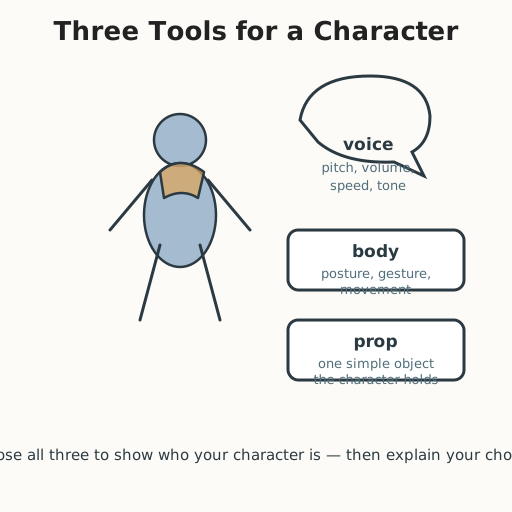
Learners invent an original character — not an imitation of a real person or a stereotype — and bring it to life with three tools: voice (pitch, volume, speed, tone), body (posture, gesture, movement), and a simple prop or costume piece. They perform the character and explain what each choice was meant to communicate.
Objectives
- Create a character using voice, body, and a simple prop or costume, and explain what they chose to communicate. (D07.S3.04.02)
Connection
You already “play characters” every day without noticing — you soften your voice for a baby, straighten up when you are proud, and pick up a certain object to show what you are doing. An actor makes these choices on purpose. A slow, low voice says something different from a quick, high one; a hunched body says something different from a tall one; a scarf can be a cape, a blanket, or a bag. When you choose each part on purpose, you are communicating — sending a message without saying it out loud.
Materials
- A simple prop or costume piece per learner (scarf, hat, stick, bag, cloth)
- Character planning page (voice, body, prop, “what I want to communicate”)
Preparation
- Gather simple props and costume pieces.
- Copy a character planning page for each learner.
Facilitator note
This lesson is written to the learner (“you”). Creating a character is a skill, so model a worked example first (Kirschner, Sweller & Clark, 2006): become a character for a few seconds and narrate each choice — “I am an old tree-keeper, so my voice is slow and creaky, my body is bent, and I hold this stick like a walking staff.” Then invite learners to try. Set a clear boundary: characters must be invented, not imitations of real people, accents, disabilities, or cultural stereotypes — those imitations can mock or misrepresent, which harms real people. A character can be a person, animal, object, or idea. After each performance, ask the two questions that matter: “What were you trying to communicate?” and “What did the audience read from it?” — the gap between them is the learning. Every body can perform: a wheelchair or a mobility aid can be part of the character, and a voice or a gesture alone can carry a whole character.
Procedure
- Gather (5 min). You have made, read, listened, and danced. Today you become someone new — a character you invent, built from three tools.
- Meet the three tools (10 min). Look at the guide graphic.
- Voice: pitch (high or low), volume (loud or soft), speed (fast or slow), tone (warm or sharp).
- Body: posture, gesture, movement.
- Prop: one simple object — a scarf, a stick, a hat — that the character uses. Watch the worked example: a bent body, a slow creaky voice, a stick as a staff — an old tree-keeper. What did each choice tell you?
- Plan your character (10 min). Choose a character you invent — not a real person or a stereotype. On your planning page, write: What will your voice do? What will your body do? What prop will you use? And most important: what do you want to communicate — a feeling, an idea, a moment?
- Perform (15 min). Perform your character for a partner or small group for about thirty seconds. Then explain your choices: “I made my voice low to show…, I hunched to show…, I held the scarf like…”
- Close (5 min). Ask your audience what they read from your character. Did it match what you meant? Every choice is a message — choose on purpose.
Differentiation
- Support: Offer a character idea menu (a storm, a shy fox, a proud captain) and one tool to focus on at a time.
- Extension: Add a second prop or a costume piece, and write one line of dialogue for the character to speak.
- Support (non-speaking): Build the character entirely with body and prop, and point to pictures to explain what each choice communicates.
Assessment
- Formative (observation): Does the learner use voice, body, and a prop, and explain what each choice was meant to communicate?
- Performance (peer): The audience reports what they understood, and the learner compares it to their intention.
Home connection
At home, create a character with a family member — one voice choice, one body choice, and one object — and guess what each other’s character was trying to communicate.
Resources
- No external resources required; the claims in this lesson are about the learner’s own creative choices and the everyday truth that voice, body, and objects carry meaning.