Lesson 08 — Design for a User
Learners design and make something for a specific user and a real need, using a five-step cycle: ask, imagine, make, try with the user, and improve. They gather the user's feedback and revise their prototype, learning that good design serves a real person.
Objectives
Objectives
- D07.S4.04.01 Design and make something for a specific user and need, and gather feedback to improve it.
Essential question
How do I design and make something for a real person's need?
Key vocabulary
Materials
Standard materials
- Building materials · per learner or group Cardboard, paper, tape, string, fabric scraps, recycled containers
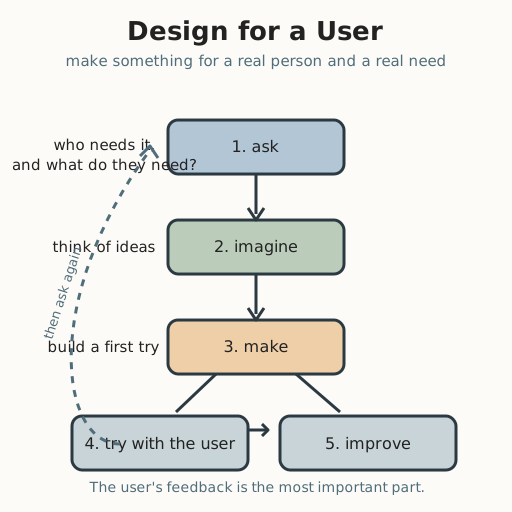
- Design cycle graphic · 1 Ask, imagine, make, try with the user, improve
Low-tech / no-cost
- Found and natural materials Sticks, leaves, cloth, clay or mud, stones, and string to build with
- A real person as the user Design for a family member, classmate, or neighbor and ask them directly
Enriched / lab & device
- A simple 3D-printer or cardboard cutter (if available) · 1 For a more finished prototype; not required
- A photo or drawing tablet · 1 per group To sketch and revise the design digitally
Works in different contexts
- large-group Model the design cycle once as a class, then pairs each design for their own user and share prototypes in a gallery
- multi-age Older learners interview the user and write feedback; younger learners build and test a simpler version
- self-directed A learner picks a real user, asks what they need, builds a prototype, and asks the user to try it and suggest one improvement
- outdoor-only Build with natural materials outdoors and have the user test the prototype right there
Lesson 8 — Design for a User
Summary
Learners design and make something for a specific user and a real need — not for themselves, but for someone they can actually ask. They follow a five-step cycle — ask, imagine, make, try with the user, improve — build a simple prototype, gather the user’s feedback, and revise it. Along the way they discover that good design includes everyone, especially people whose needs are often left out.
Objectives
- Design and make something for a specific user and need, and gather feedback to improve it. (D07.S4.04.01)
Connection
Someone you know has a small problem every day — a grandparent whose hands get tired opening a jar, a younger sibling whose pencil keeps rolling away, a friend who uses a wheelchair and wishes a table were the right height. A designer does not guess; a designer asks. When you make something for a real person and let them try it, they tell you what works and what does not — and your idea gets better. This is how the things you use every day, from a cup to a ramp, were made: someone asked, imagined, made, tried, and improved.
Materials
- Building materials (cardboard, paper, tape, string, fabric scraps, recycled containers)
- Design cycle graphic
Preparation
- Print or display the design cycle graphic.
- Gather building materials and arrange a space for making and testing.
Facilitator note
This lesson is written to the learner (“you”). The design cycle is a skill, so walk through it as a worked example before independent work (Kirschner, Sweller & Clark, 2006): “My user is a grandparent whose hands tire — I’ll make a fatter, softer handle for a pencil; here is my cardboard prototype; now let’s have the grandparent try it and tell me what to change.” Help learners choose a user they can actually interview (a classmate, sibling, or you). Feedback is the heart: schedule a moment when each learner asks their user to try the prototype and say one thing to keep and one thing to change. Emphasize accessibility and fairness — a design that serves someone often serves many (the “curb-cut effect”), and the best designers ask who is being left out. Keep the build simple; the thinking matters more than the finish. A learner with limited fine motor may design by directing a partner, or choose a need they can prototype with large pieces.
Procedure
- Gather (5 min). You have made art, music, and movement. Today you make something that helps a real person — you become a designer.
- Meet the design cycle (10 min). Look at the graphic. There are five steps:
- Ask: who is my user, and what do they need?
- Imagine: think of two or three ideas.
- Make: build a first try — a prototype.
- Try with the user: let the user test it and say what works and what does not.
- Improve: change one thing and try again.
- Ask (10 min). Choose your user — someone you can talk to. Ask them: “What is something small that is hard for you?” Listen, and write their need in one sentence.
- Imagine and make (15 min). Choose one idea and build a quick prototype from the materials. It does not have to be perfect — it has to be testable.
- Try with the user and improve (15 min). Hand your prototype to the user. Ask: “Try it. What works? What is hard?” Take their feedback, change one thing, and let them try once more.
- Close (5 min). You did not guess — you asked. A good design serves a real person, and their feedback made it better.
Differentiation
- Support: Offer a need bank (pencil that rolls, bag hard to open, cup hard to grip) and a two-step version: make, then one improvement.
- Extension: Interview two different users and design for both, noting what is the same and what must change.
- Support (fine motor): Direct a partner who builds the prototype, or prototype with large pieces that are easy to handle.
Assessment
- Formative (observation): Does the learner design for a named user and need, build a prototype, and revise it after real feedback?
- Artifact (portfolio): The prototype (or a photo) plus one sentence recording the user’s feedback and the change made.
Home connection
At home, ask someone what small thing is hard for them and make a first try to help, then let them test it and tell you one thing to improve.
Resources
- UNESCO — design and education for sustainable development (a general frame): https://www.unesco.org/en/sustainable-development/education