Lesson 04 — Supporting Reasons and a Conclusion
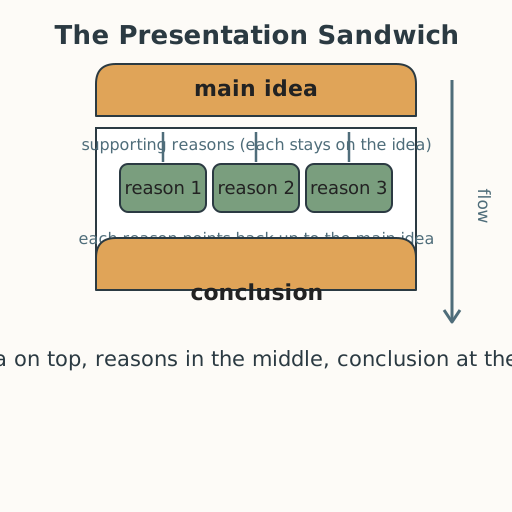
Learners complete their short presentation by adding supporting reasons and a conclusion to the main idea they built in Lesson 3. Using a "presentation sandwich" — main idea on top, reasons in the middle, conclusion at the bottom — they assemble and deliver a complete short talk to a small audience.
Objectives
Objectives
- D04.S1.05.02 Give a short presentation with a clear main idea, supporting reasons, and a conclusion.
Essential question
How do I support my main idea with reasons and end with a strong conclusion?
Key vocabulary
Materials
Standard materials
- Presentation sandwich poster · 1 A poster showing a presentation as a sandwich — main idea on top, two or three supporting reasons in the middle, conclusion at the bottom
- Reason and conclusion frames · 1 per learner A card with starters such as "One reason is ___." "Another reason is ___." and "So, remember — ___."
- The learner's main idea from Lesson 3 · 1 per learner Each learner brings the one-sentence main idea they built last lesson
Low-tech / no-cost
- Voice, a partner, and your main idea Say your main idea, add two reasons aloud, and end with "So, remember — ___"; no poster needed
- A 'reason or not' game Say a sentence aloud and have partners signal whether it supports the main idea or drifts away
Enriched / lab & device
- A recording device · 1 per group To record the full short presentation and replay it to check the flow from main idea to reasons to conclusion
- A presentation sandwich chart · 1 A shared chart where learners post their main idea, reasons, and conclusion for a gallery walk
Works in different contexts
- large-group Build one complete sandwich aloud on the board together, then have learners assemble their own in small groups
- multi-age Younger learners give one reason and a simple ending while older learners give two or three reasons and a fuller conclusion
- self-directed A learner writes their main idea, two supporting reasons, and a conclusion, then reads the whole aloud to check it flows
- level-grouped Learners ready to extend reorder their reasons from strongest to weakest and explain their choice
- outdoor-only Assemble the sandwich aloud in a circle — each learner speaks one piece, the main idea, a reason, or the conclusion
Lesson 4 — Supporting Reasons and a Conclusion
Summary
Learners complete their short presentation by adding supporting reasons and a conclusion to the main idea they built in Lesson 3. Using a “presentation sandwich” — main idea on top, reasons in the middle, conclusion at the bottom — they assemble and deliver a complete short talk to a small audience.
Objectives
- Give a short presentation with a clear main idea, supporting reasons, and a conclusion. (D04.S1.05.02)
Connection
“You should try growing your own beans.” Why? Without reasons, that sentence floats. “You should try growing your own beans — they’re cheap to plant, they don’t need much space, and they taste better fresh.” Now the idea has feet. And a good speaker ends by landing it: “So if you have a pot and a patch of sun, give beans a try.” A main idea is the start; reasons carry it, and a conclusion brings it home — whether you’re talking about beans, a book, or a football match.
Materials
- Presentation sandwich poster
- Reason and conclusion frames
- The learner’s main idea from Lesson 3
Preparation
- Print or draw the presentation sandwich poster (main idea / reasons / conclusion).
- Copy reason-and-conclusion frames for each learner.
- Have learners bring or recall the one-sentence main idea they built last lesson.
Facilitator note
This lesson is written to the learner (“you”). The idea to land is that a presentation has a shape: a clear main idea, supporting reasons that stay on it, and a conclusion that returns to it. Model one complete sandwich aloud first. Watch for “drifting” reasons — ones that wander to a new topic — and gently bring them back with “does that support your main idea?” Let learners deliver to a small, friendly audience; a warm listener makes a nervous speaker clearer. Speaking in the home language is welcome; clarity for this audience is the measure.
Procedure
- Gather (5 min). Last lesson you built your presentation’s heart: one clear main idea. Today you give it strength — reasons — and a strong finish — a conclusion.
- Meet the sandwich (10 min). Look at the poster. A presentation is like a sandwich. The top slice is your main idea. The middle is supporting reasons — two or three, each one staying on the idea. The bottom slice is your conclusion, which returns to the main idea and leaves the audience with one thing to remember. A worked example: Main idea: “Growing your own beans is worth trying.” Reason 1: “They’re cheap to plant.” Reason 2: “They need little space.” Reason 3: “They taste better fresh.” Conclusion: “So if you have a pot and some sun, give beans a try.”
- Learn the frames (5 min). Read the frames: “One reason is ___.” “Another reason is ___.” “So, remember: ___.” Practice each once, aloud.
- Build your sandwich (20 min). Take your main idea from last lesson. Say it, then add two or three supporting reasons, each one checking itself: does this support my main idea? End with a conclusion using “So, remember: ___.” Deliver the whole short presentation to a small audience. They answer one question: “Could you follow the idea, the reasons, and the ending?”
- Close (5 min). You have now done what strong speakers do everywhere: one clear idea, reasons to believe it, and an ending that lands. Next you will look inside what you read the way you just built what you say.
Differentiation
- Support: Provide a reason bank to choose from, and allow one reason plus a simple ending; scribe if writing is a barrier. A learner may present while seated and may show each part — main idea, reasons, conclusion — by pointing, signing, or using a device instead of speaking aloud.
- Extension: Reorder reasons from strongest to weakest, and add a “so what” sentence to the conclusion that tells the audience why it matters.
Assessment
- Formative (performance/peer): Does the presentation have a clear main idea, at least two on-topic reasons, and a conclusion that returns to the idea?
- Self-check: The learner asks, “Did each reason point at my main idea, and did my ending bring the audience back to it?”
Home connection
Deliver your mini presentation to someone at home — main idea, two reasons, and a conclusion — and ask which reason convinced them most.
Resources
- Clear organization (main idea → support → conclusion) aids audience recall; see the research summarized in Hattie, Visible Learning, and Marzano’s work on summarizing and structure. For classroom speaking-and-listening framing, see CASEL: https://casel.org/fundamentals-of-sel/.