Lesson 09 — Design and Build Something That Solves a Real Problem
Learners design and build a working prototype that solves a real problem in their class or community, and learn to explain their choices. A worked example walks the design cycle — name the problem, imagine, choose materials, build, test, improve — on a real problem (rain coming under a door), then learners run the cycle on a problem they choose, building, testing, and explaining each decision.
Objectives
Objectives
- D07.S4.05.01 Design and build something that solves a real problem in their class or community, and explain the choices they made.
Essential question
How do I design and build something that solves a real problem, and explain my choices?
Key vocabulary
Materials
Standard materials
- Design journal page · 1 per learner A page with boxes for the problem, my idea (sketch), materials I will use, why I chose them, and what happened when I tested it
- Building materials · per group Cardboard, paper, tape, string, plastic bags, scissors, glue, and found objects — enough to build small prototypes
- Test setup · 1 Whatever the class problem needs for testing — a cup of water, a weight, a fan, a sloping surface
Low-tech / no-cost
- Found and natural materials Sticks, stones, leaves, clay, cloth, and recycled containers — build with whatever the environment provides
- A spoken design journal State the problem, the idea, the materials, and the "why" aloud to a partner; no paper needed
Enriched / lab & device
- Simple tools and fasteners · per group A hole punch, paper fasteners, rubber bands, or a low-temperature glue gun (with supervision) for sturdier prototypes
- A design wall or photo log · 1 A space to photograph or display prototypes and the "why" behind each choice
Works in different contexts
- large-group Choose one shared class problem and build in small teams, each taking a different approach, then compare how each choice solved it
- multi-age Older learners lead the build and explain choices while younger learners gather materials and help test
- self-directed A learner identifies their own real problem, designs, builds, and tests a prototype, and writes the reason for each choice
- level-grouped Learners ready to extend run two build-test-improve cycles and document how the second version changed from the first
- outdoor-only Solve a real outdoor problem — shade a plant, keep water from pooling, carry gathered sticks — using natural materials
Lesson 9 — Design and Build Something That Solves a Real Problem
Summary
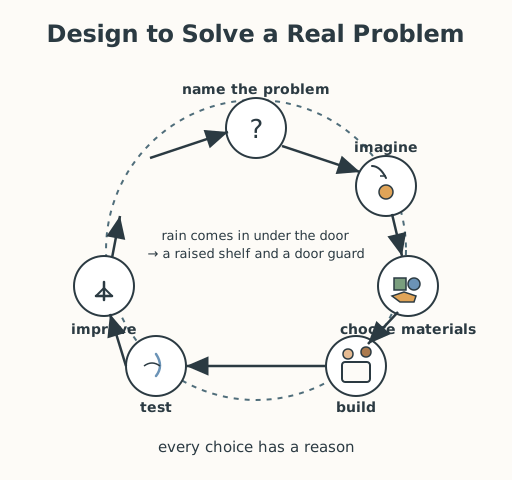
Learners design and build a working prototype that solves a real problem in their class or community, and learn to explain their choices. A worked example walks the design cycle — name the problem, imagine, choose materials, build, test, improve — on a real problem (rain coming under a door), then learners run the cycle on a problem they choose, building, testing, and explaining each decision.
Objectives
- Design and build something that solves a real problem in the class or community, and explain the choices made. (D07.S4.05.01)
Connection
Everyone designs, even without the word for it. A cook changes a recipe when a spice is missing. A farmer rigs a shade of sticks and leaves to protect young seedlings from the noon sun. A child dams a stream with stones to make a pool. Design is just this: see a real problem, imagine a fix, choose what you have, build it, try it, and make it better. Today you become a designer — and you learn to say why you made each choice, so others can learn from your thinking.
Materials
- Design journal page
- Building materials
- Test setup
Preparation
- Copy a design journal page for each learner.
- Gather building materials and set up whatever the class problem needs for testing.
- Recall Grade 4: learners designed for a specific user and need and gathered feedback to improve; Grade 3: imagine, plan, make, improve.
Facilitator note
This lesson is written to the learner (“you”). The idea to land is the design cycle with
reasons: every choice — material, shape, method — gets a “why,” and the build is tested
against a real problem. Model the worked example fully before learners begin (explicit
instruction for a novice skill — Kirschner, Sweller & Clark, 2006). Let the problem be
real — the class or community should actually have it (a wet floor, a hot classroom, a
messy shared shelf, a wobbly table, a garden that dries out). Prototypes will be rough;
that is the point — testing and improving are the learning, not perfection. Celebrate
explanation as much as the build. This is the design lens: technology as a tool with
effects, chosen on purpose. See docs/facilitation.md and docs/contexts.md.
Procedure
- Gather (5 min). Think of a small problem you have actually seen — a door that sticks, a plant that dries out, a shelf that tips. Today you will design and build something that solves a real problem, and explain each choice you make.
- Meet the cycle (10 min). Look at the design-cycle diagram. Here is a worked example. Problem: during the rainy season, water comes in under the door and wets our book shelf. Imagine: raise the shelf off the floor and put a guard at the door’s foot. Choose materials: cardboard and a plastic bag — cardboard is stiff, plastic repels water. Build: a raised base under the shelf and a folded guard along the door. Test: pour a little water and watch. Improve: the water still slips under one edge, so tape the guard down and angle it outward. Notice: every step has a reason.
- Name your problem (5 min). Choose one real problem in your class or community — one you could actually test a small fix for today.
- Design and build (20 min). On your journal page, write the problem, sketch your idea, list your materials, and write why you chose each. Then build a small prototype. Work with care, as if this fix will really be used.
- Test and improve (10 min). Test your prototype against the problem. Did it work? Change one thing that didn’t, and try again. Write what happened.
- Explain your choices (5 min). Show your prototype to a partner or the class. Say the problem, your idea, and the reason for at least one material or shape choice. This is how designers think out loud.
Differentiation
- Support: Provide a pre-named problem and a small menu of materials with their properties (“cardboard = stiff; plastic = waterproof”), and scribe the “why” sentence.
- Support (seated and fine-motor options): Build at a table so the work is at a comfortable height for learners who sit; offer larger, easier-to-grip materials (wide tape, pre-cut shapes, tearable card, thick glue sticks), and let a learner who finds cutting or fastening hard choose the materials, direct a partner’s hands, run the test, or keep the spoken/written journal — the design thinking is the learning, not the cutting.
- Extension: Run two full build–test–improve cycles and write how the second version differs from the first and why.
Assessment
- Portfolio (observation/performance): Does the learner build a prototype that addresses a real problem and explain at least one material or shape choice with a reason?
- Self-check: The learner asks, “Did my prototype actually address the problem, did I test it, and can I explain why I chose my materials and shape?”
Home connection
Find a small problem at home and design a fix for it — then tell someone your choice and the reason for it.
Resources
- The engineering design process (define, imagine, build, test, improve) is a core practice of elementary engineering education; see the Smithsonian Science Education Center’s design-cycle framing: https://ssec.si.edu/