Lesson 02 — One Way to Release Tension
Learners name and practice one concrete way to release tension: squeeze-and-release (progressive muscle relaxation) paired with slow breathing. They meet a worked example, follow a four-step card, and run the technique on their own hands and shoulders, noticing which spot lets go. This is a named, evidence-grounded release skill for life.
Objectives
Objectives
- D03.S1.06.02 Explain how emotions and body sensations connect, such as stress and tension, and name one way to release tension.
Essential question
What is one way I can release the tension stress leaves in my body?
Key vocabulary
Materials
Standard materials
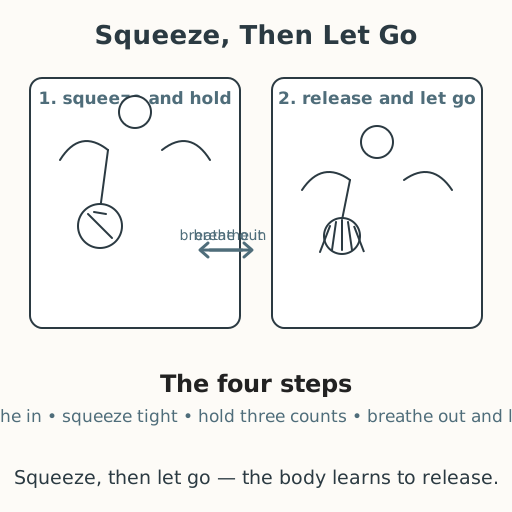
- Squeeze-and-release poster · 1 A poster showing a hand in two states — a tight fist labeled "squeeze" and an open, soft hand labeled "release" — with a slow-breath arrow between them
- Tension-release card · 1 per learner A small card listing the four steps — breathe in, squeeze tight, hold, breathe out and let go — with space to draw it
- Pencils · per learner
Low-tech / no-cost
- Your own hands, shoulders, and breath Practice squeeze-and-release with only the body and voice — no page or card needed
- A squeeze object (stone, cloth, or stick) Squeeze a safe found object then let it go to feel the contrast of tight and soft
Enriched / lab & device
- A class 'release' corner with a guided-audio option · 1 A recorded slow-breathing prompt learners can play to guide a full tense-and-release sequence
- A heart-rate or breathing timer app · 1 per group Optional tool to notice the breath slow — used as a help, with the body's own signals first
Works in different contexts
- large-group Lead one whole-class squeeze-and-release sequence aloud, then have learners practice in pairs with the card
- multi-age Younger learners practice one muscle group (hands or shoulders); older learners run the full sequence and explain why slow breathing helps
- self-directed A learner follows the four steps on the card alone, repeats the sequence three times, and notices which spot let go the most
- level-grouped Learners ready to extend compare two release techniques — squeeze-and-release and slow breathing alone — and say when each might help more
- outdoor-only Sit on the ground, squeeze and release the hands and shoulders in time with slow counted breaths; no equipment needed
Lesson 2 — One Way to Release Tension
Summary
Learners name and practice one concrete way to release tension: squeeze-and-release (a form of progressive muscle relaxation) paired with slow breathing. They meet a worked example, follow a four-step card, and run the technique on their own hands and shoulders, noticing which spot lets go. This is a named, evidence-grounded release skill — one they can use anywhere, for the rest of their lives.
Objectives
- Explain how emotions and body sensations connect, such as stress and tension, and name one way to release tension. (D03.S1.06.02)
Connection
Have you ever noticed that after a hard, stressful day your shoulders stay up near your ears even when the work is done? The body can forget to let go. There is a simple way to teach it again: tighten on purpose, then release. A potter squeezes clay and then opens her hands; a breath held and then let out is the same shape. Squeeze-and-release works the same way — by tightening a muscle fully, then letting it go, you remind your body what soft feels like, wherever you are.
Materials
- Squeeze-and-release poster
- Tension-release card
- Pencils
Preparation
- Print or draw the squeeze-and-release poster (a fist labeled “squeeze” and an open hand labeled “release,” with a slow-breath arrow between).
- Copy a tension-release card for each learner.
- Arrange a circle with room to sit or stand comfortably.
Facilitator note
This lesson is written to the learner (“you”). The idea to land is one named, usable way to
release tension: squeeze-and-release with slow breathing. Teach it as a skill with explicit
steps and a worked example (this is a novice technique, not a discovery). Keep it gentle and
never forceful — a learner should squeeze to comfortable firmness, never to pain, and any
muscle group may be skipped. Slow breathing engages the body’s calming (parasympathetic)
response; present it as a tool, not a cure, and as one of many ways different people and
cultures release tension — not the only right one. See docs/facilitation.md and
docs/contexts.md.
Procedure
- Gather (5 min). Last time you learned that stress shows up as tension — tight shoulders, a clenched jaw, a knot in the stomach. Today you learn to release it, with one simple technique you can use anywhere.
- Meet the technique (10 min). Look at the poster — a worked example. Two states of the same hand. First: a tight fist, shoulders up — squeeze. Second: an open, soft hand, shoulders down — release. Between them, a slow breath out. This is squeeze-and-release: breathe in, squeeze tight and hold for a few counts, then breathe out slowly and let the muscle go completely soft. Tightening first makes the letting-go easier to feel.
- Learn the four steps (5 min). Read your card: ① breathe in; ② squeeze tight; ③ hold for three slow counts; ④ breathe out and let go. Try it once with your hands: make a gentle fist, squeeze, hold, then open your fingers wide and soft.
- Practice together (15 min). Run the sequence slowly through three spots: your hands, then your shoulders (lift them toward your ears, squeeze, then drop them), then your jaw (press your teeth gently together, then let your jaw hang loose). After each release, notice: where did you feel the most “letting go”? Draw or circle it on your card.
- Close (5 min). Tension is not something to fight; it is something to notice and release. You now hold one named technique for it — squeeze, then let go, breathing slowly. It works because you already practiced it.
Differentiation
- Support: Practice only one muscle group (hands) and count the breaths aloud together; scribe the drawing.
- Extension: Compare squeeze-and-release with slow breathing alone, and write one sentence about when each might help more (before a test, at night, after a game).
Assessment
- Formative (performance): Can the learner follow the four steps — breathe in, squeeze, hold, breathe out and let go — and name the technique in their own words?
- Self-check: The learner asks, “Did I actually feel a spot let go? Which one, and could I do this again without help?”
Home connection
Teach someone at home the four steps — squeeze, hold, breathe out, let go — and try it together once before bed.
Resources
- Squeeze-and-release is a form of progressive muscle relaxation, developed by Edmund Jacobson and still widely used to lower physical tension. Slow, extended exhaling engages the body’s calming (parasympathetic) response — a well-documented mind–body link. Release techniques exist in many traditions (breath work, stretching, rest), and no single one is required; this lesson teaches one evidence-grounded, portable option. For classroom SEL framing, see CASEL’s self-management competency: https://casel.org/fundamentals-of-sel/