Lesson 10 — Designing for a Community Need
Learners identify a real community need, research it, and generate and document ideas and a first prototype, learning the design process — find, research, imagine, prototype, test — and the habit of recording every decision.
Objectives
Objectives
- D07.S4.10.01 Design and make something that serves a community need with attention to sustainability and fairness, and document the decisions.
Essential question
How do I design and make something that serves a real community need, and document my decisions?
Key vocabulary
Materials
Standard materials
- Design log · 1 per learner A running record with sections for the need, who is served, research, ideas, and decisions
- Sketch paper and pencil · 1 per learner
- Simple making materials (card, cloth, wire, tape, found objects) · shared Enough for quick low-fidelity prototypes
Low-tech / no-cost
- Found and reused materials (cardboard, cloth, string, natural objects) Everything needed to prototype a small idea
- Paper and pencil for the design log Drawn and written by hand
Enriched / lab & device
- A shared device to research the need or view real design examples (optional) · 1 per group To ground the need in evidence
- Digital or fabrication tools for a later prototype (optional) · 1 per group Previewed here; used fully in later lessons
Works in different contexts
- large-group Brainstorm community needs whole-class, then learners choose one and work the process in pairs, sharing one decision each
- multi-age Younger learners identify a need and draw one idea; older learners add research, constraints, and a documented decision
- self-directed A learner observes their own community, chooses one need, and works the process alone, writing each decision in the log
- level-grouped Learners ready to extend interview a real stakeholder about the need and fold the answer into their design
- outdoor-only Observe needs in the immediate environment (shade, seating, water, a path) and prototype with found materials on site
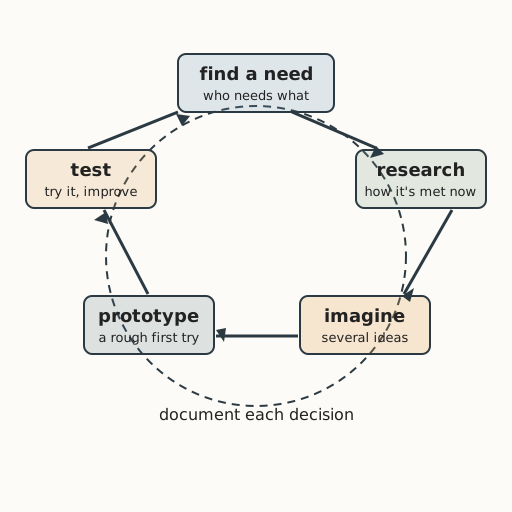
Lesson 10 — Designing for a Community Need
Summary
Learners identify a real community need, research it, and generate and document ideas and a first prototype, learning the design process — find a need, research, imagine, prototype, test — and the habit of recording every decision. This opens the making-and-design strand; sustainability and fairness sharpen it in Lesson 11.
Objectives
- Design and make something that serves a community need with attention to sustainability and fairness, and document the decisions. (D07.S4.10.01)
Connection
Every useful thing around you began as someone noticing a need — a seat where people wait, a handle that is easy to grip, a path where feet kept wearing the grass. Design is not decorating an object; it is noticing a real problem a real group of people have, and making something that helps. Today you become that noticer, and you write down what you decide and why.
Materials
- Design log
- Sketch paper and pencil
- Simple making materials (card, cloth, wire, tape, found objects)
Preparation
- Retrieval: from Lessons 1, 4, and 7, recall building a body of work, a piece, and a sequence around one idea. Design is the same habit, pointed at a need.
- Prepare one worked example of the design process applied to a small need (e.g., a shade structure for a waiting spot) with each decision documented.
Facilitator note
This lesson is written to the learner (“you”). The idea to land: design is a process — find a need, research it, imagine, prototype, test — and documentation is not paperwork but the thing that makes a decision defensible and shareable. A “community need” can be tiny (a shaded seat, a better path, a container that keeps food dry) — small is fine; real is what matters. The design log is the through-line that will let learners later defend their choices on sustainability and fairness (Lesson 11) and judge responsible versus harmful design (Lesson 12).
The ethics lens: good design begins with serving people, not impressing a judge — the need is the moral center. The egalitarian lens: ask who is served and who is left out from the very first idea; a design that helps only the most able-bodied or the richest has already failed a fairness test. The global lens: needs differ by place and climate — a shade structure matters differently in a hot dry town than in a cold wet one — so design is always local before it is general. The technology lens: tools (digital or fabrication) can extend what a designer can make — but they never replace the noticing. The environment lens: from the first sketch, ask what the thing is made of and where it goes when it breaks (deepened in Lesson 11). The community lens is the spine: design is done with and for a community, never to it.
Model one worked example (worked example → guided practice → independent design; S-011). Keep prototypes low-fidelity — the point is the thinking and the record, not a finished object.
Procedure
- Recall (5 min). You have made art, music, and movement around one idea. Today you make a thing around one need.
- Meet the process (10 min). Watch a worked example: a shaded seat for a waiting spot. See the five stages — find a need, research, imagine, prototype, test — and see each decision written in the log.
- Find a need (10 min). Think of your community — school, street, market, home, or a place you know. List three small needs. Choose one and write in your log: “The need is ______, and it matters to ______.”
- Research and imagine (15 min). Look around (or ask) how this need is met now — and where it is not. Sketch two or three ideas. Note the constraints: what materials, skills, and time are available?
- Prototype (10 min). Build a rough first version of your best idea with the materials at hand. It does not need to work perfectly; it needs to show the idea.
- Close (5 min). Write one decision you made and why, in your log. Keep the log and prototype in your portfolio. Next: sustainability and fairness.
Differentiation
- Support: Provide a short list of small needs to choose from and ask for one idea with one documented reason.
- Extension: Ask one real person who would use the thing what they actually need, and revise the idea in response.
- Non-motor / non-visual path: The prototype can be described in words and sketched by a partner, or built by a partner under the designer’s spoken direction; the design log is the document of thinking and can be spoken and transcribed rather than written by hand.
- Language: The design log may be kept in the learner’s home language, with key decisions translated to a shared language for sharing; the five stages (find, research, imagine, prototype, test) carry cleanly across languages.
Assessment
- Formative (self): Can the learner name a real need, state who it serves, produce one idea and a rough prototype, and document at least one decision with a reason?
- Portfolio artifact (unit): The design log’s first page (need, who is served, idea, one documented decision) and the rough prototype, added to the portfolio.
Home connection
Walk your home or street and find one small unmet need. Tell someone what you would design for it and who it would help.
Resources
- On the design process and universal design principles: The Center for Universal Design, “The Principles of Universal Design,” https://design.ncsu.edu/research/center-for-universal-design/ (S-369).
- On sustainable development as meeting present needs without compromising the future: World Commission on Environment and Development, Our Common Future (Brundtland Report, 1987), https://www.are.admin.ch/are/en/home/media/publications/sustainable-development/brundtland-report.html (S-395).
- On worked examples before independent work: Kirschner, Sweller & Clark (2006), https://doi.org/10.1207/s15326985ep4102_1 (S-011).